Now on the App Store

FileFly for
iPhone

Send photos, videos and documents straight between your iPhone and computer over your own Wi-Fi. There is no cable to connect, no account to create and no cloud upload in the middle.

Free, like every other FileFly app. Made for iPhone; iPad is not supported in this release.

What would you like to do?

Choose a task and go straight to the instructions you need.

Start in three steps

FileFly does not use accounts or pairing codes. Install it, allow the one connection it needs, and your devices find each other.

  1. 01

    Install FileFly

    Get FileFly from the App Store on your iPhone and install the free desktop app on your Windows, Mac or Linux computer.

  2. 02

    Open it on both devices

    Leave FileFly open on the computer, then open it on your iPhone. Both devices must be using the same Wi-Fi network.

  3. 03

    Allow Local Network access

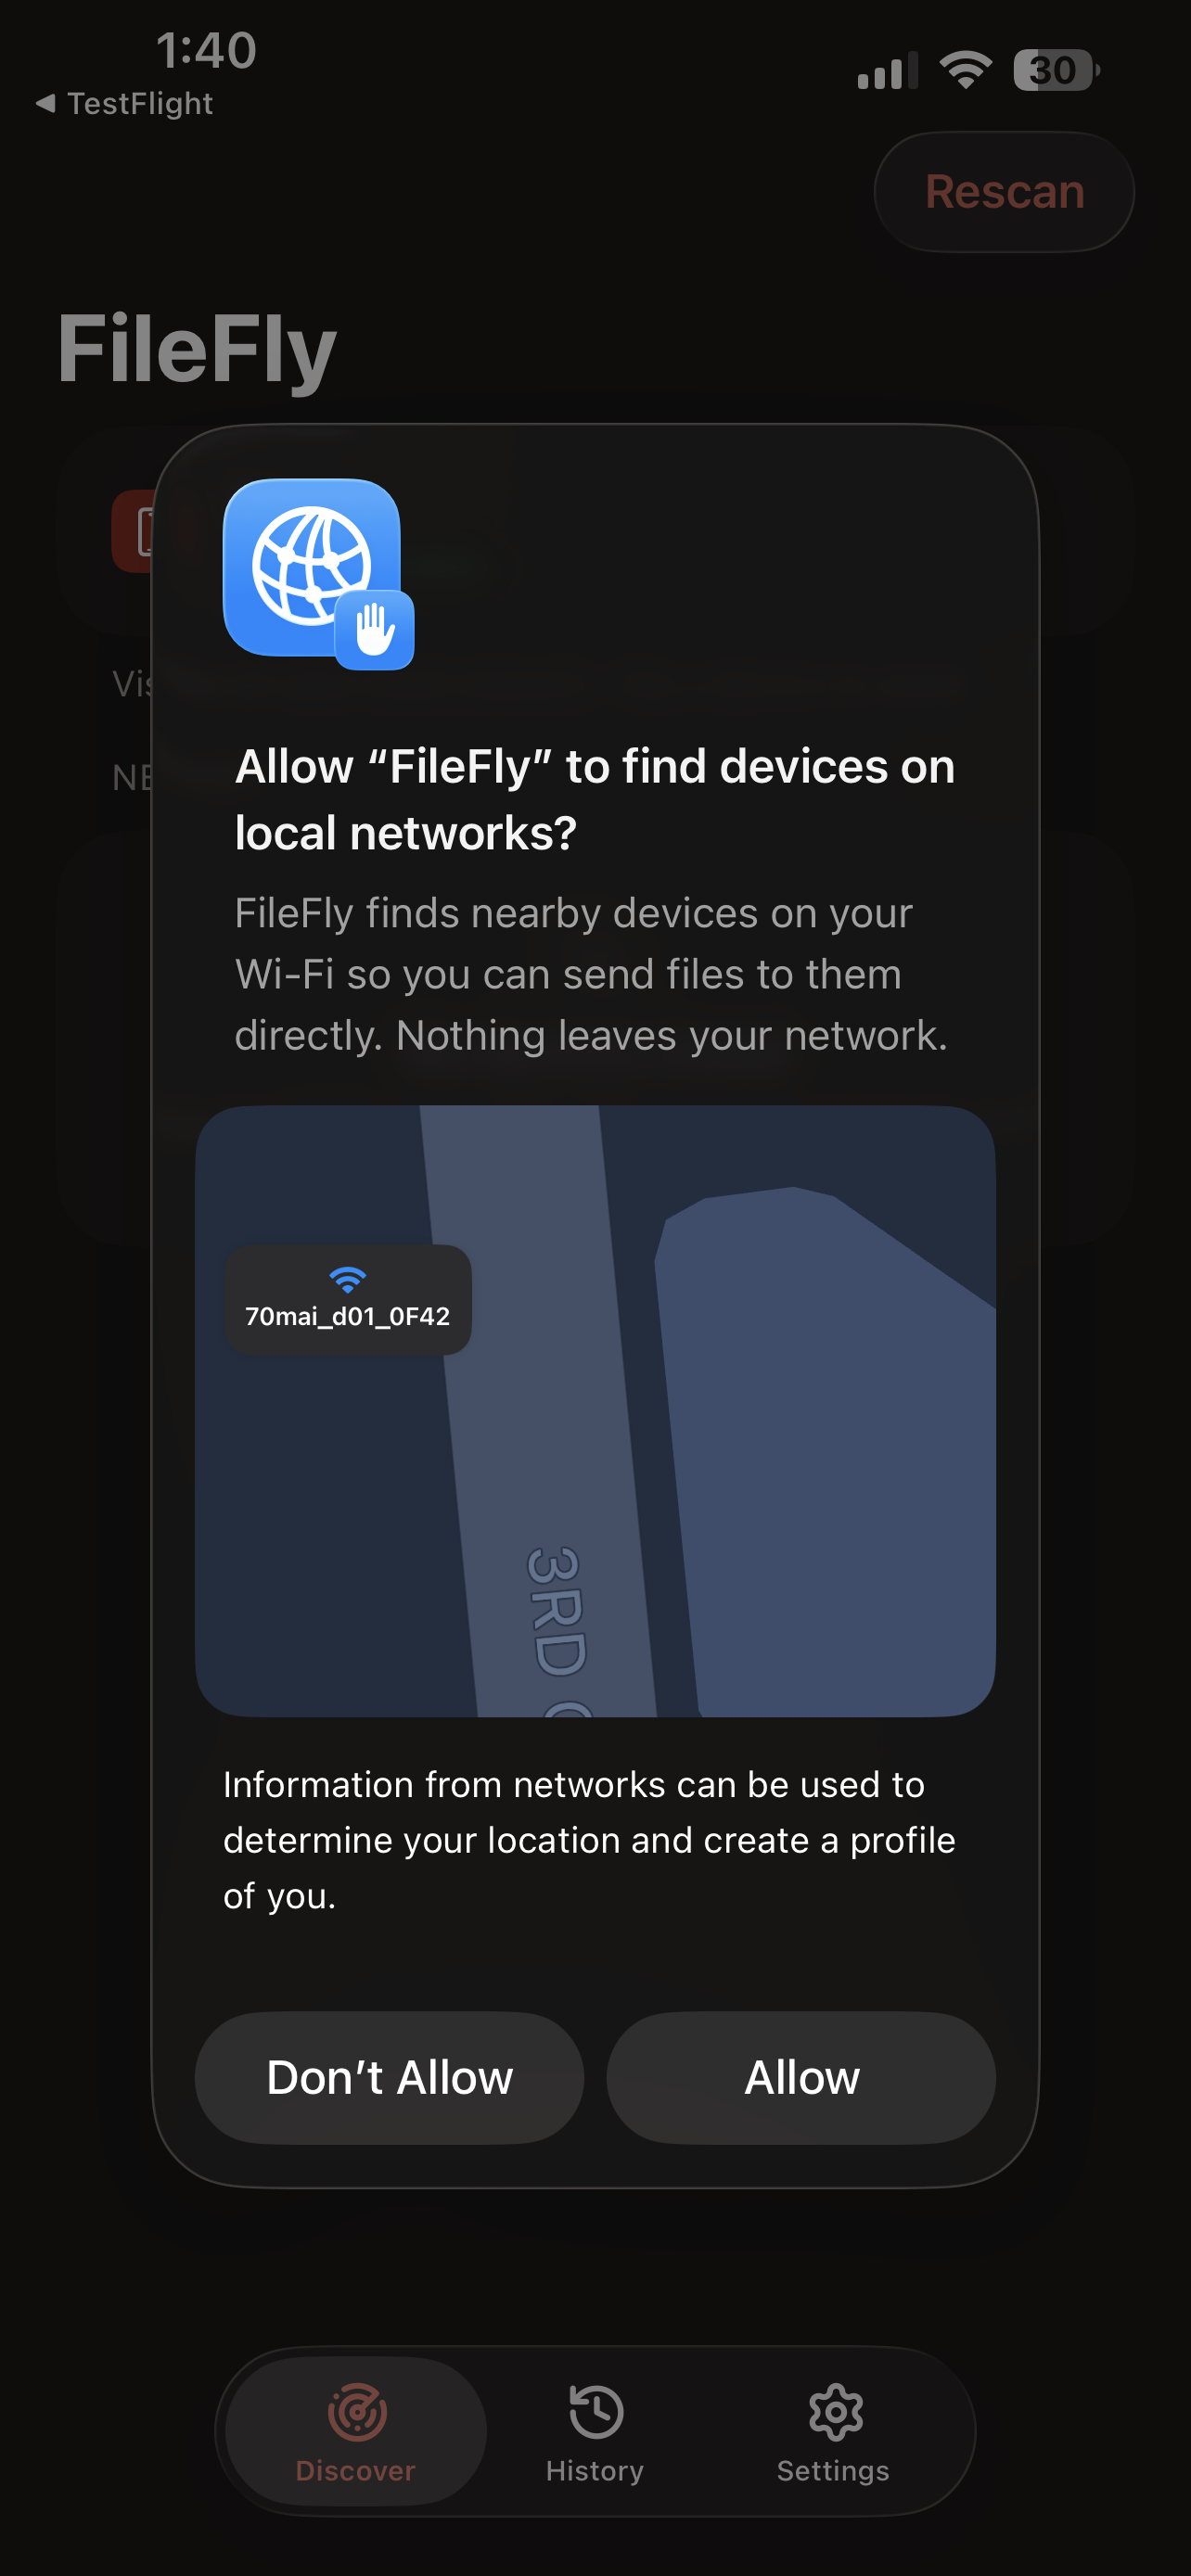
    The first time FileFly opens, iOS asks whether it can find devices on your local network. Tap Allow so your computer can appear.

Before your first transfer

Check these four things once. They solve most connection problems before they happen.

  • The same network

    Put both devices on the same Wi-Fi. Main and guest networks are separate, even when they belong to the same router. Turn off a VPN while you transfer.

  • Local Network permission

    Tap Allow when iOS asks. If you declined, open iPhone Settings → FileFly and turn on Local Network.

  • FileFly open at both ends

    A device must be running FileFly to appear. Keep FileFly on screen on the iPhone until the transfer finishes.

  • Allow the firewall prompt

    If the computer asks whether FileFly may communicate through the firewall, choose Allow. On Windows, enable it for Private networks.

Your computer and iPhone, both directions

These steps work with Windows, macOS and Linux. One device offers the files, the other accepts them, and the files move directly over your network.

ComputeriPhone

From your computer to iPhone

Receive a file, photo or video on your phone.

  1. 1

    Get both on the same Wi-Fi

    Use the same Wi-Fi network, not separate main and guest networks. There is no account, pairing code or cable.

  2. 2

    Open FileFly on both

    Leave FileFly open on the computer, then open it on your iPhone. The phone should appear within a few seconds.

  3. 3

    Choose the iPhone and file

    Select your iPhone in FileFly and choose what to send. On Windows, allow FileFly for Private networks if the firewall asks.

  4. 4

    Accept it on the phone

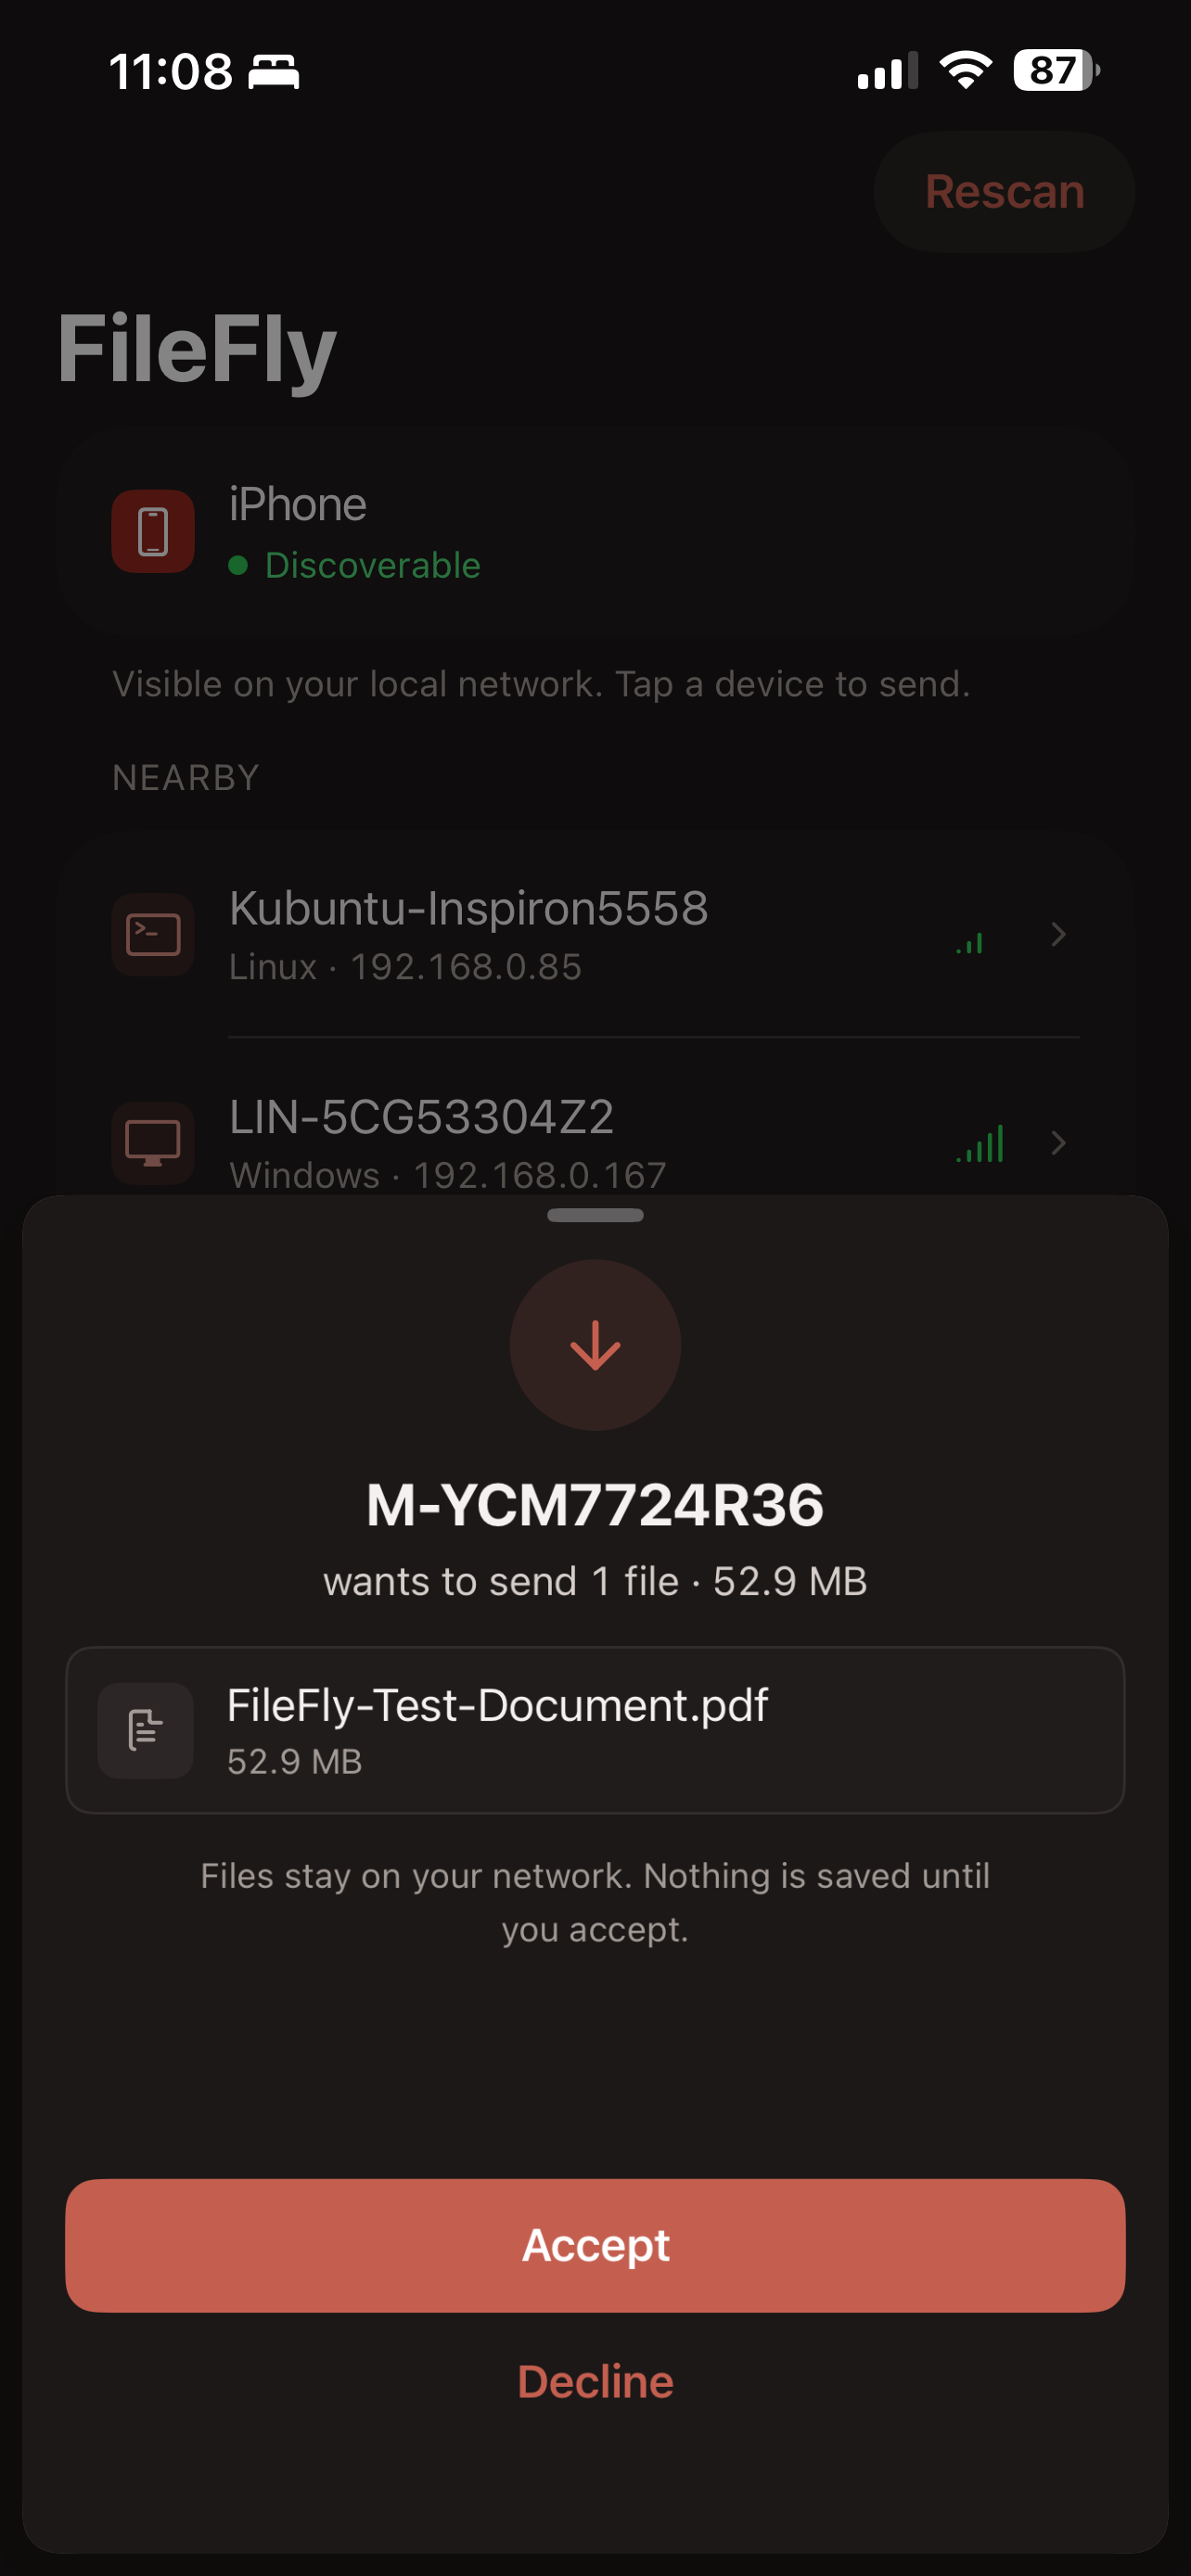
    A sheet slides up on your iPhone naming the PC, the files and the total size. Tap Accept. Photos and videos are saved to your photo library; everything else goes into the FileFly folder in the Files app.
iPhoneComputer

From your iPhone to a computer

Move photos, videos or documents off the phone.

  1. 1

    Tap your computer

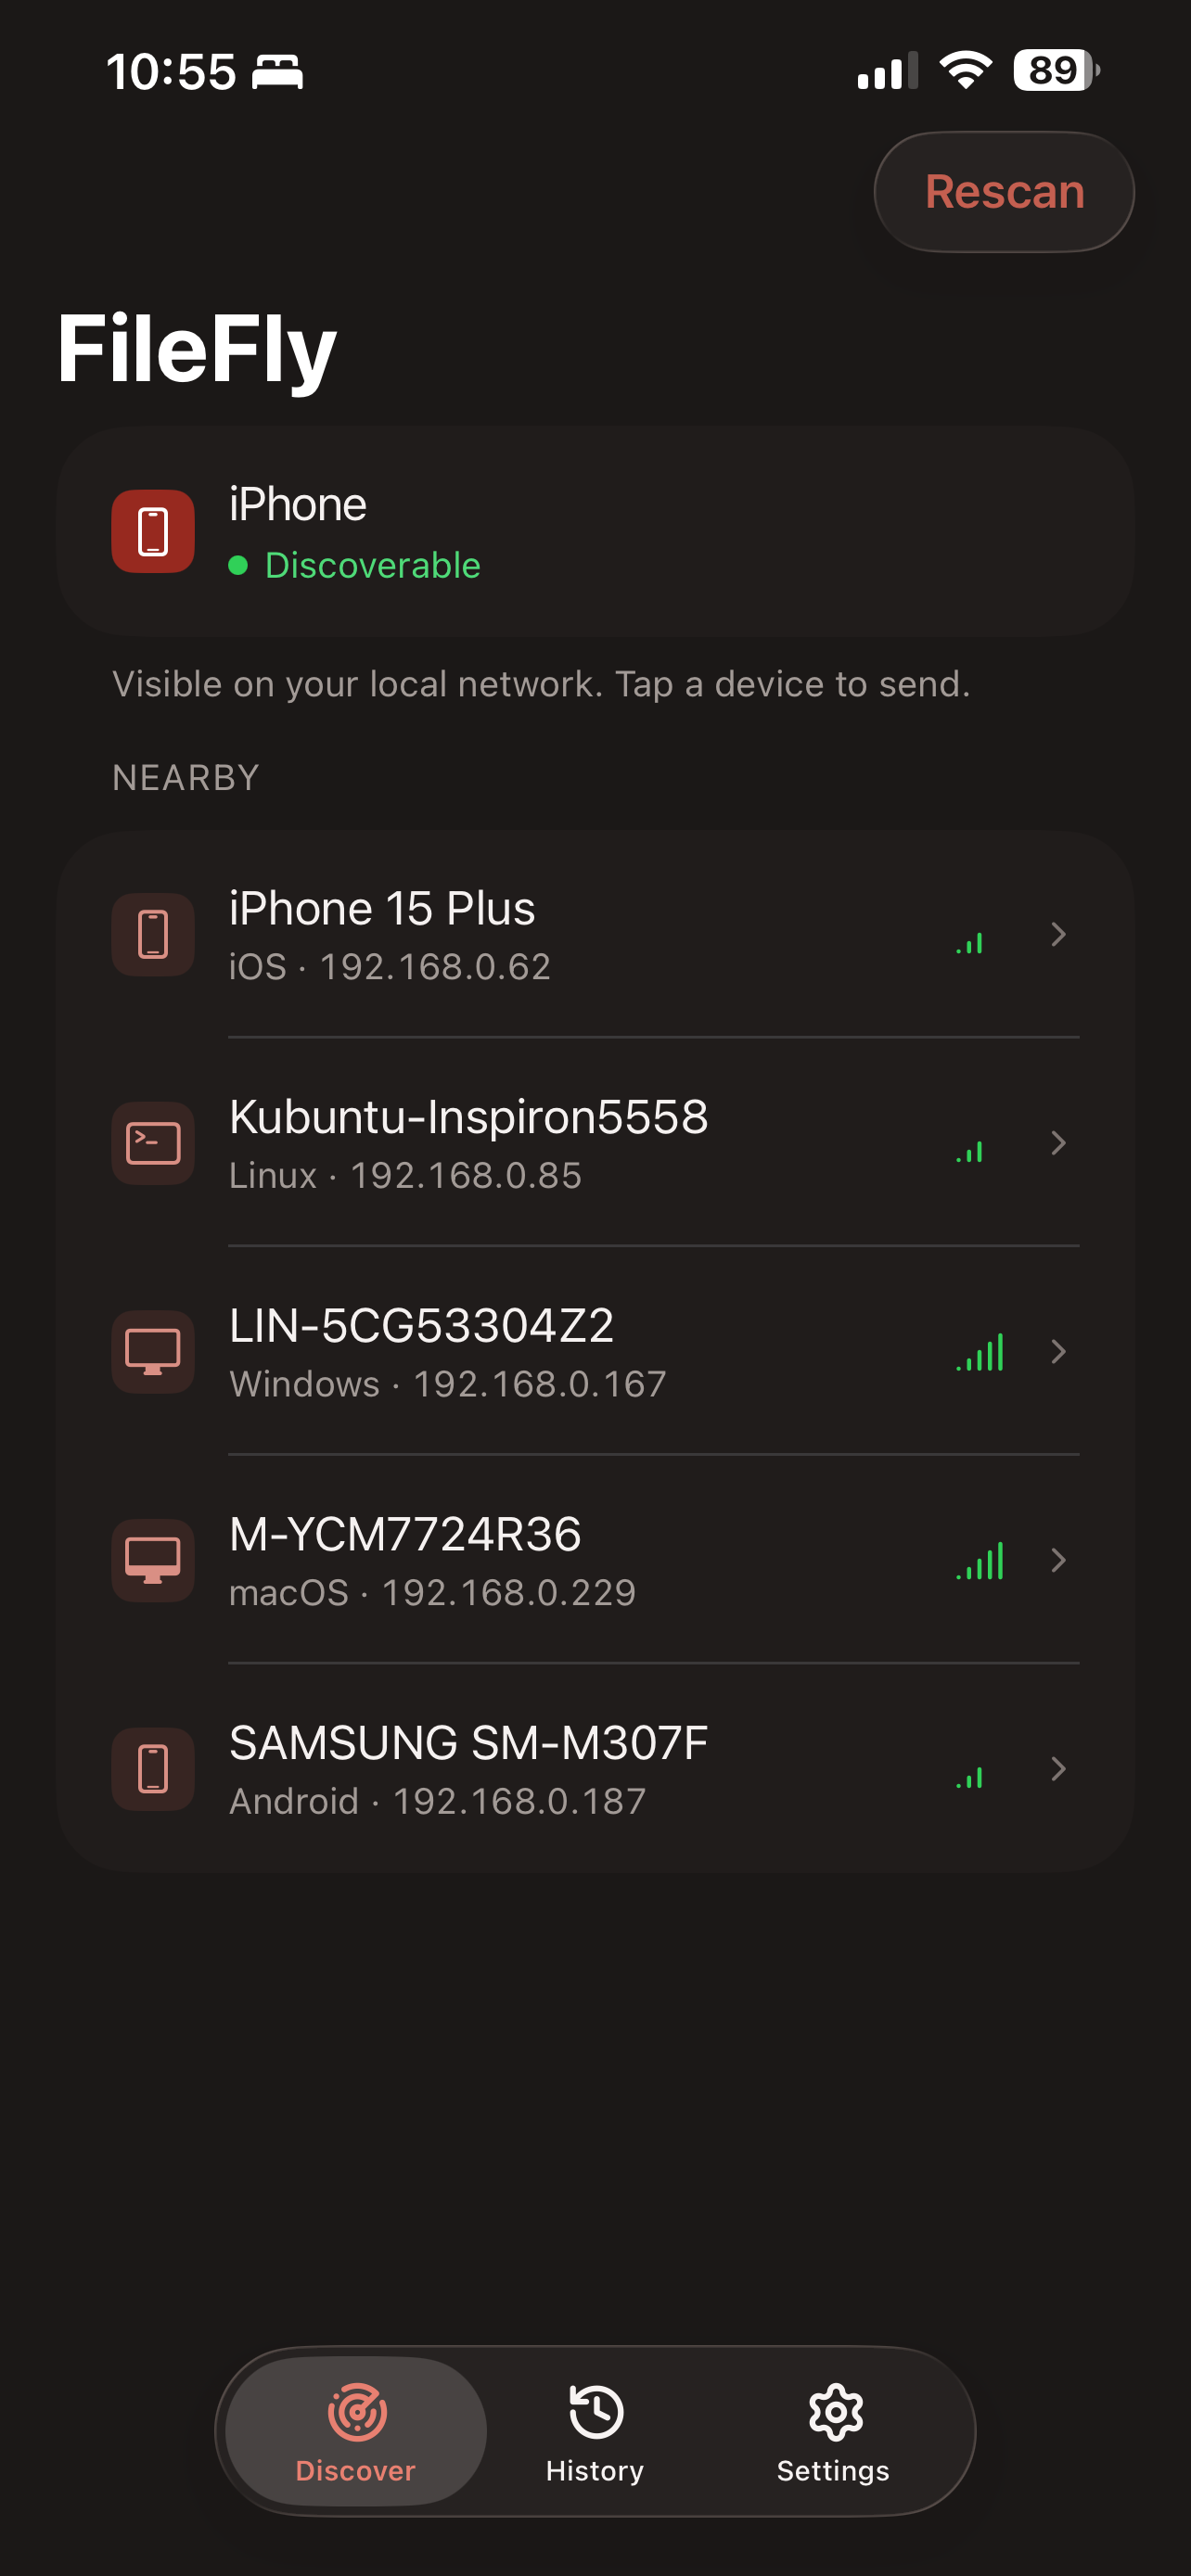
    With FileFly open on both devices, the computer appears under Nearby. Tap Rescan or pull down if it takes a moment to appear.

  2. 2

    Add the files

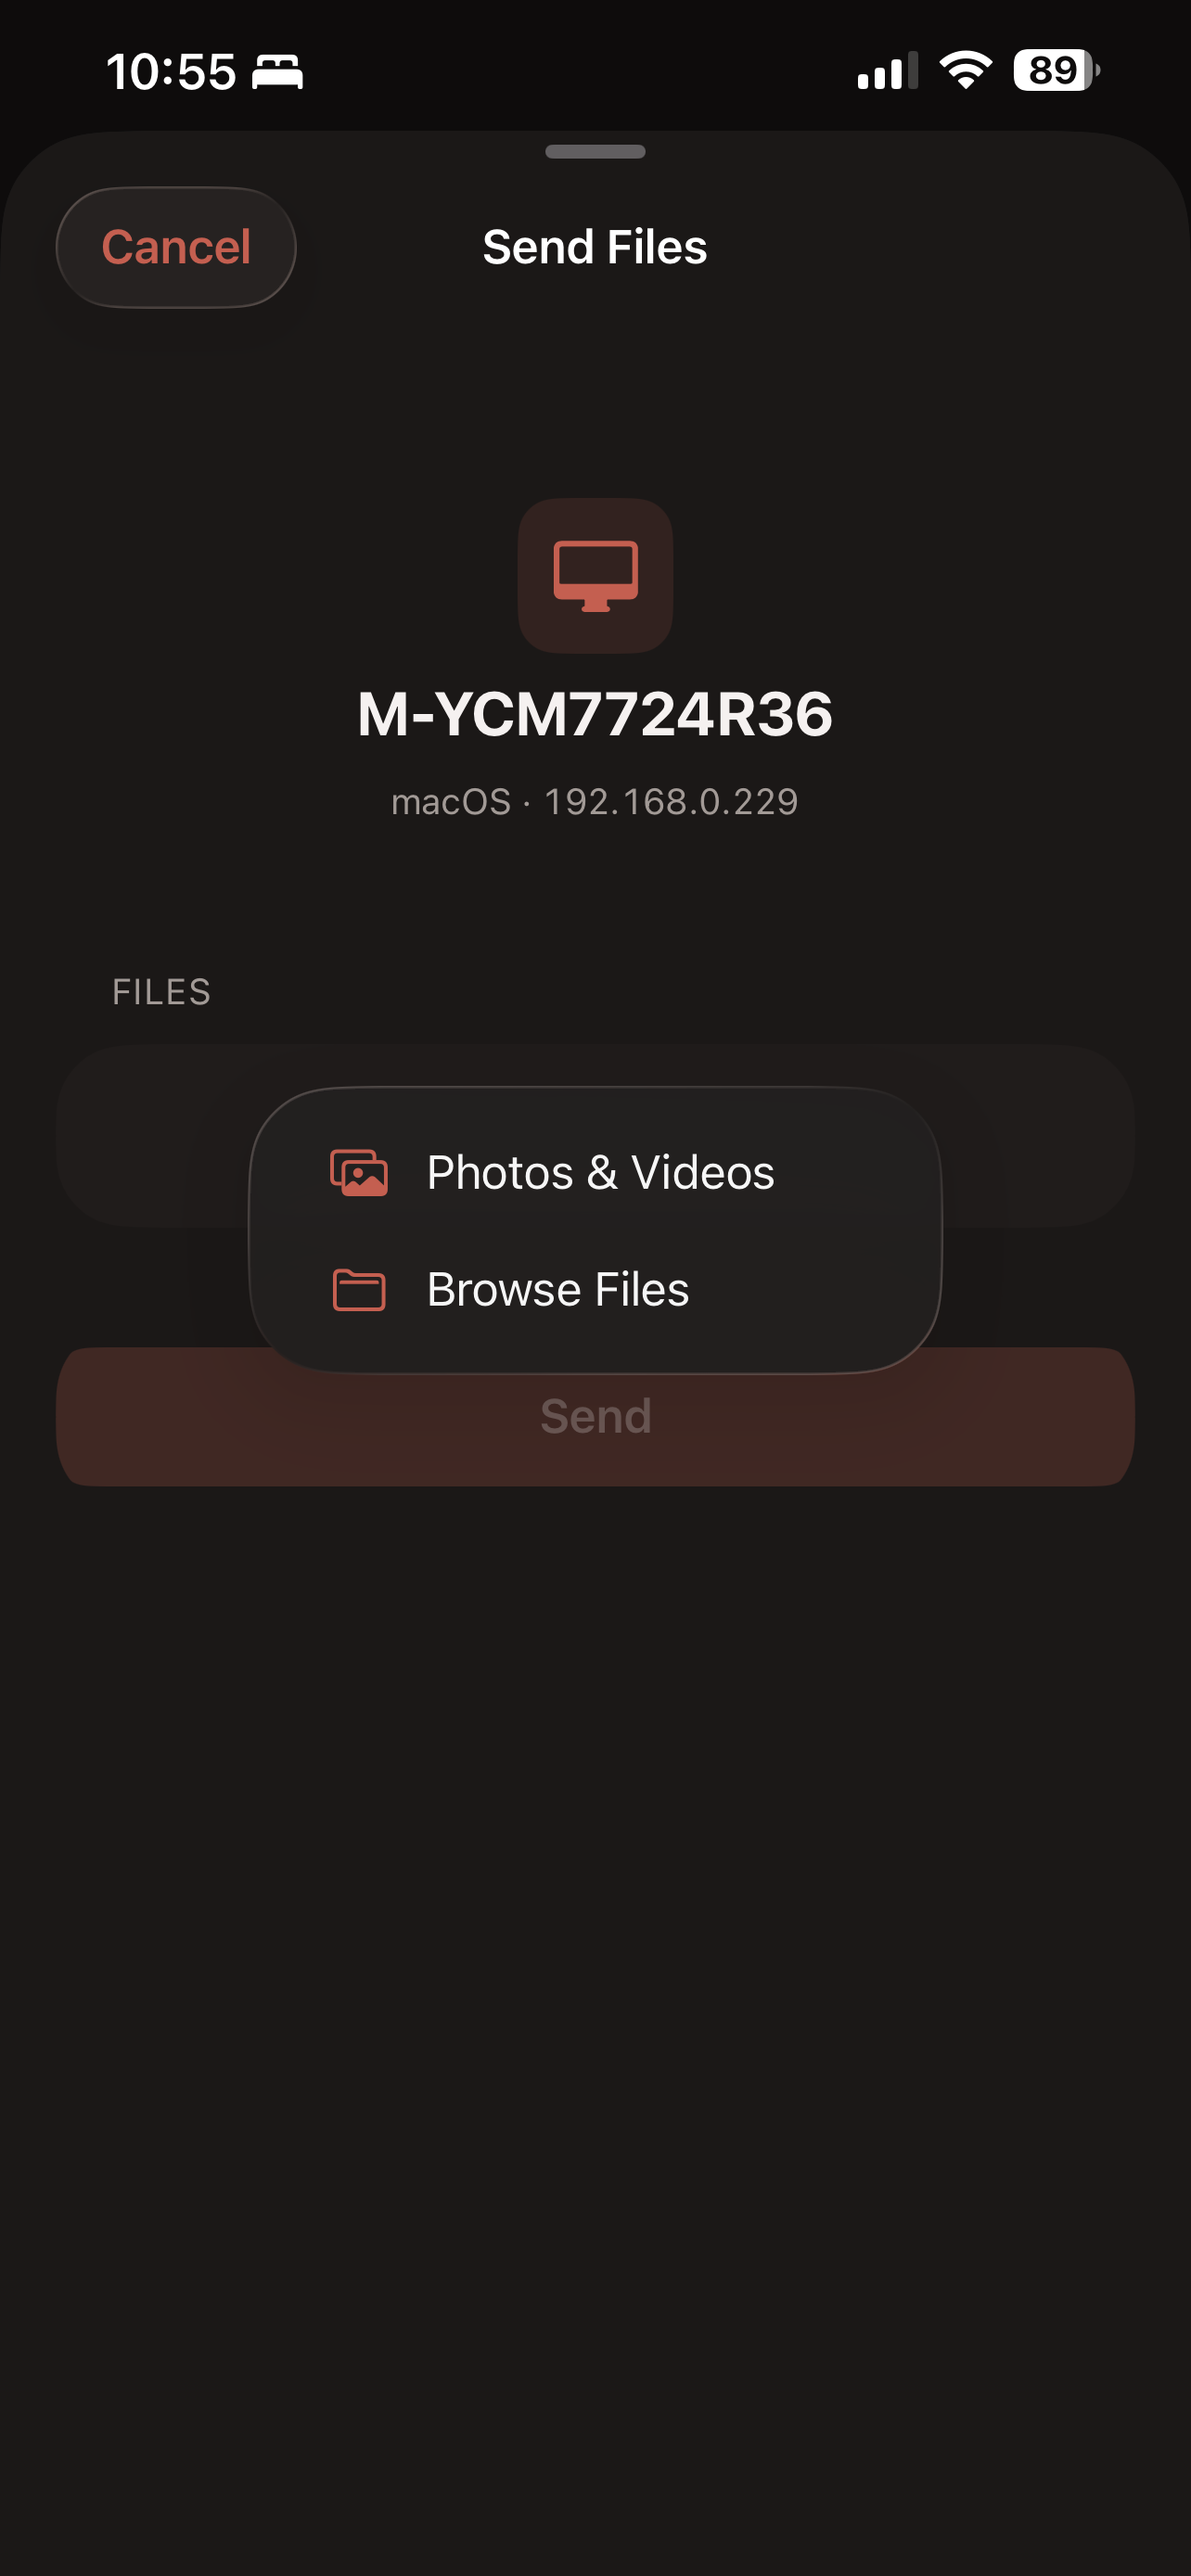
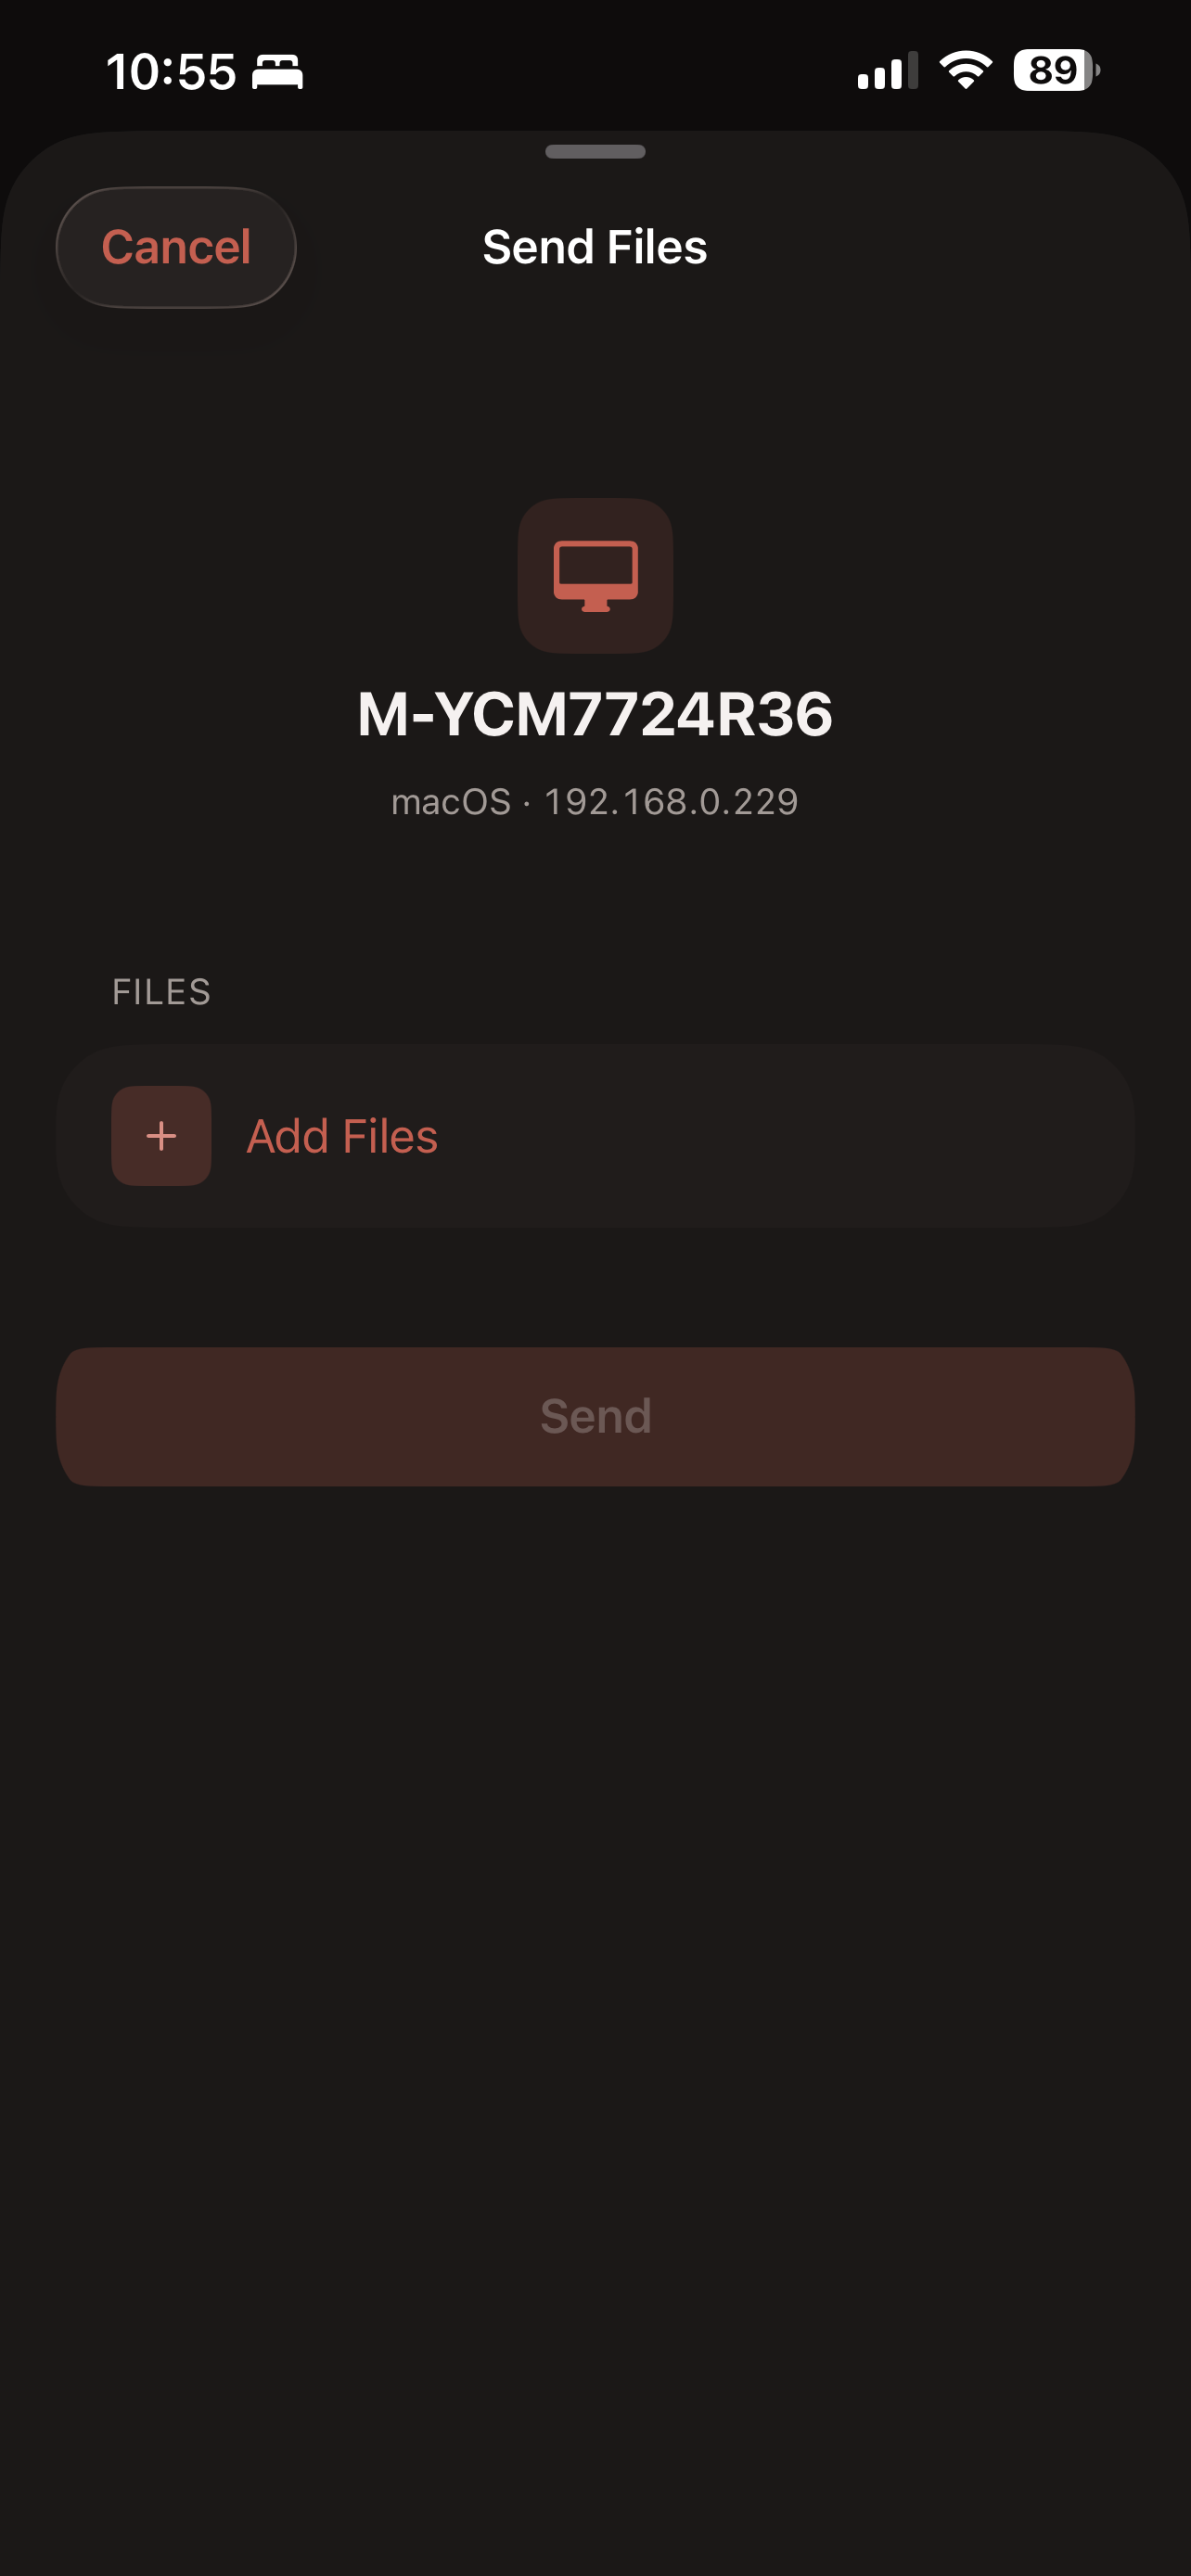
    Tap Add Files, then choose Photos & Videos or Browse Files. Select one item or several.

  3. 3

    Send, and have it accepted

    Tap Send, then accept the request on the computer. Keep FileFly on screen until the transfer finishes.

  4. 4

    Find it in Downloads

    Files arrive in the computer's Downloads folder unless the location was changed in FileFly Settings.

You do not have to open FileFly first

In Photos or Files, select what you want, tap the Share button and choose FileFly from the share sheet. Pick a device and the transfer runs there and then, without leaving the app you were in.

Something not working?

Start with the problem that looks most like what you see.

My computer is not listed under Nearby

Make sure FileFly is open on the computer and both devices are on the same Wi-Fi. Tap Rescan or pull down on the iPhone list. If one device uses a guest network, move it to the main network.

I tapped Don't Allow for Local Network

Open iPhone Settings → FileFly, then turn on Local Network. Return to FileFly and tap Rescan.

The transfer paused or stopped partway

Bring FileFly back to the screen and keep the iPhone awake until the transfer finishes. Check that both devices are still connected to the same Wi-Fi, then send the unfinished files again.

Both devices are on Wi-Fi but still cannot connect

Hotel, café, office, university and some guest networks prevent devices from talking to each other. Try a trusted home network, and make sure the computer's firewall has allowed FileFly.

Every screen, explained

Need more detail? Open a section for a screen-by-screen guide to sending, receiving, History and Settings.

Some screenshots show a Mac as the destination. The steps are the same for Windows and Linux; only the device name and icon change.

7 screensSending a fileAllow the local connection, choose a device, add your files and send.
  1. Screen 01

    Allow the local connection

    On first launch, iOS asks whether FileFly may find devices on your local network. Tap Allow so your computers can appear under Nearby. If you tapped Don't Allow, restore it later under Settings → FileFly → Local Network. The location-profile paragraph is Apple's standard warning; FileFly uses this access to find nearby devices and transfer directly over your Wi-Fi.

  2. Screen 02

    The device list

    Your iPhone appears in the card at the top. A green dot and Discoverable mean other devices can find it. Under Nearby are the computers and phones currently running FileFly on the same network. Tap the device you want to send to.

  3. Screen 03

    Send Files

    The computer you chose is named at the top, so you can check the destination before anything moves. Send stays grey until you add something. Tap Add Files.

  4. Screen 04

    Photos, or any other file

    Choose Photos & Videos for items in your photo library, or Browse Files for documents, downloads and anything in the Files app. Apple's pickers only hand FileFly the items you select. You can choose several files and mix photos with documents.

  5. Screen 05

    The last screen before it moves

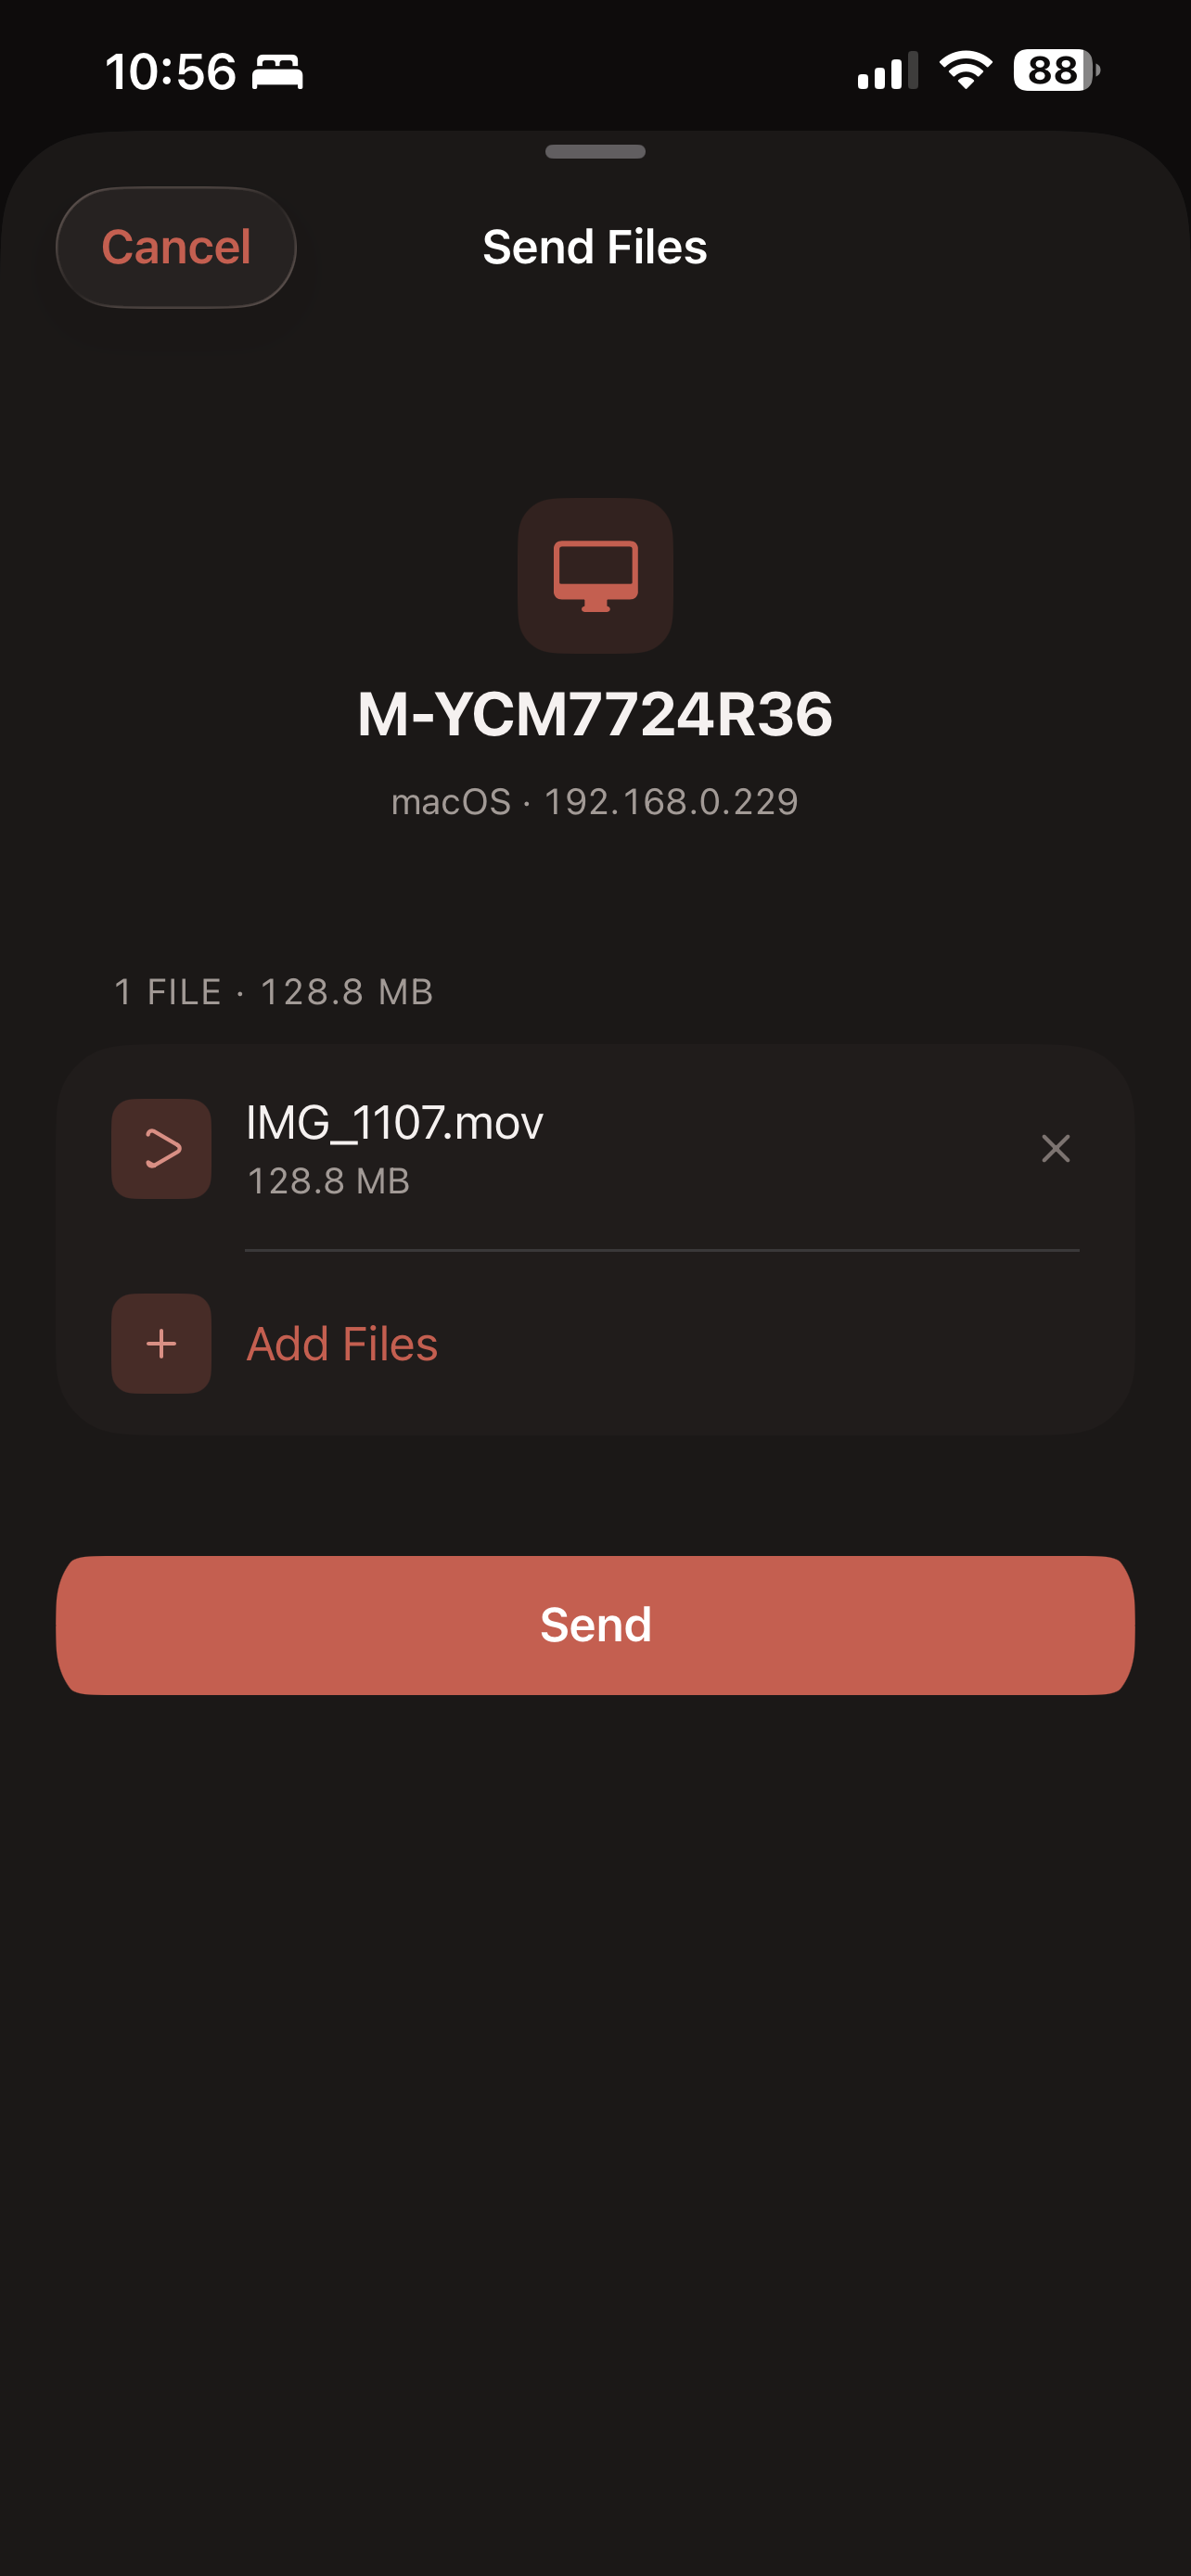
    Review the list and total before sending. Tap the cross beside a file to remove it, or Add Files to choose more. Nothing leaves your phone until you tap Send.

  6. Screen 06

    The transfer running

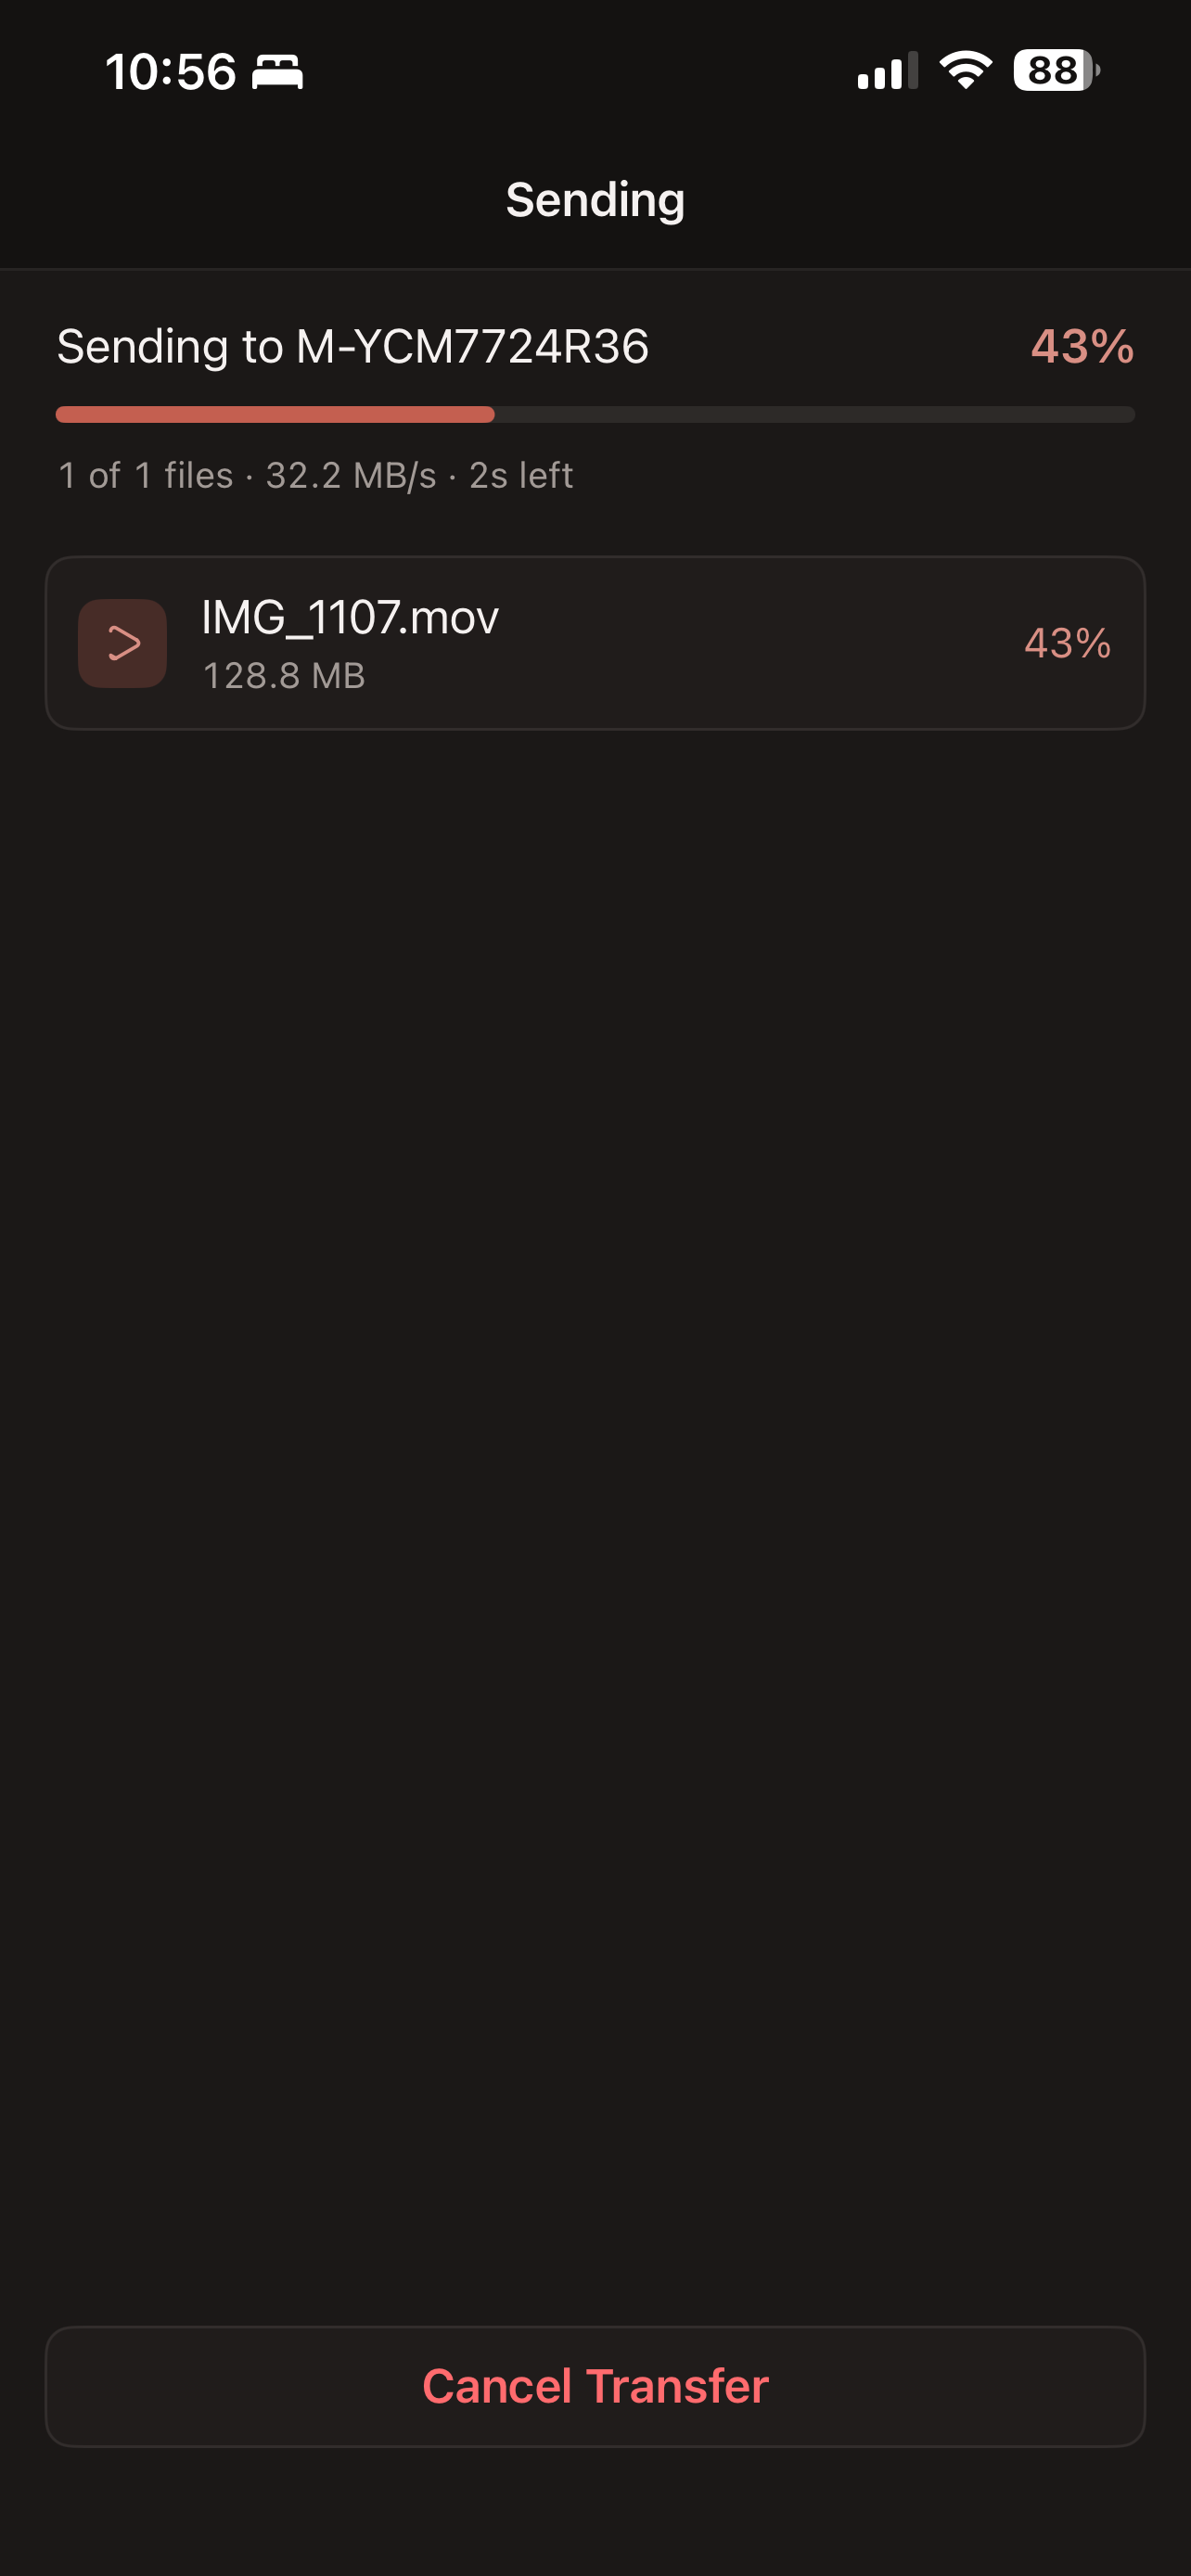
    The computer asks someone to accept the files. Once accepted, this screen shows the overall percentage, current file, speed and estimated time. Cancel Transfer stops the remaining transfer; files that already finished stay on the computer.

  7. Screen 07

    Done

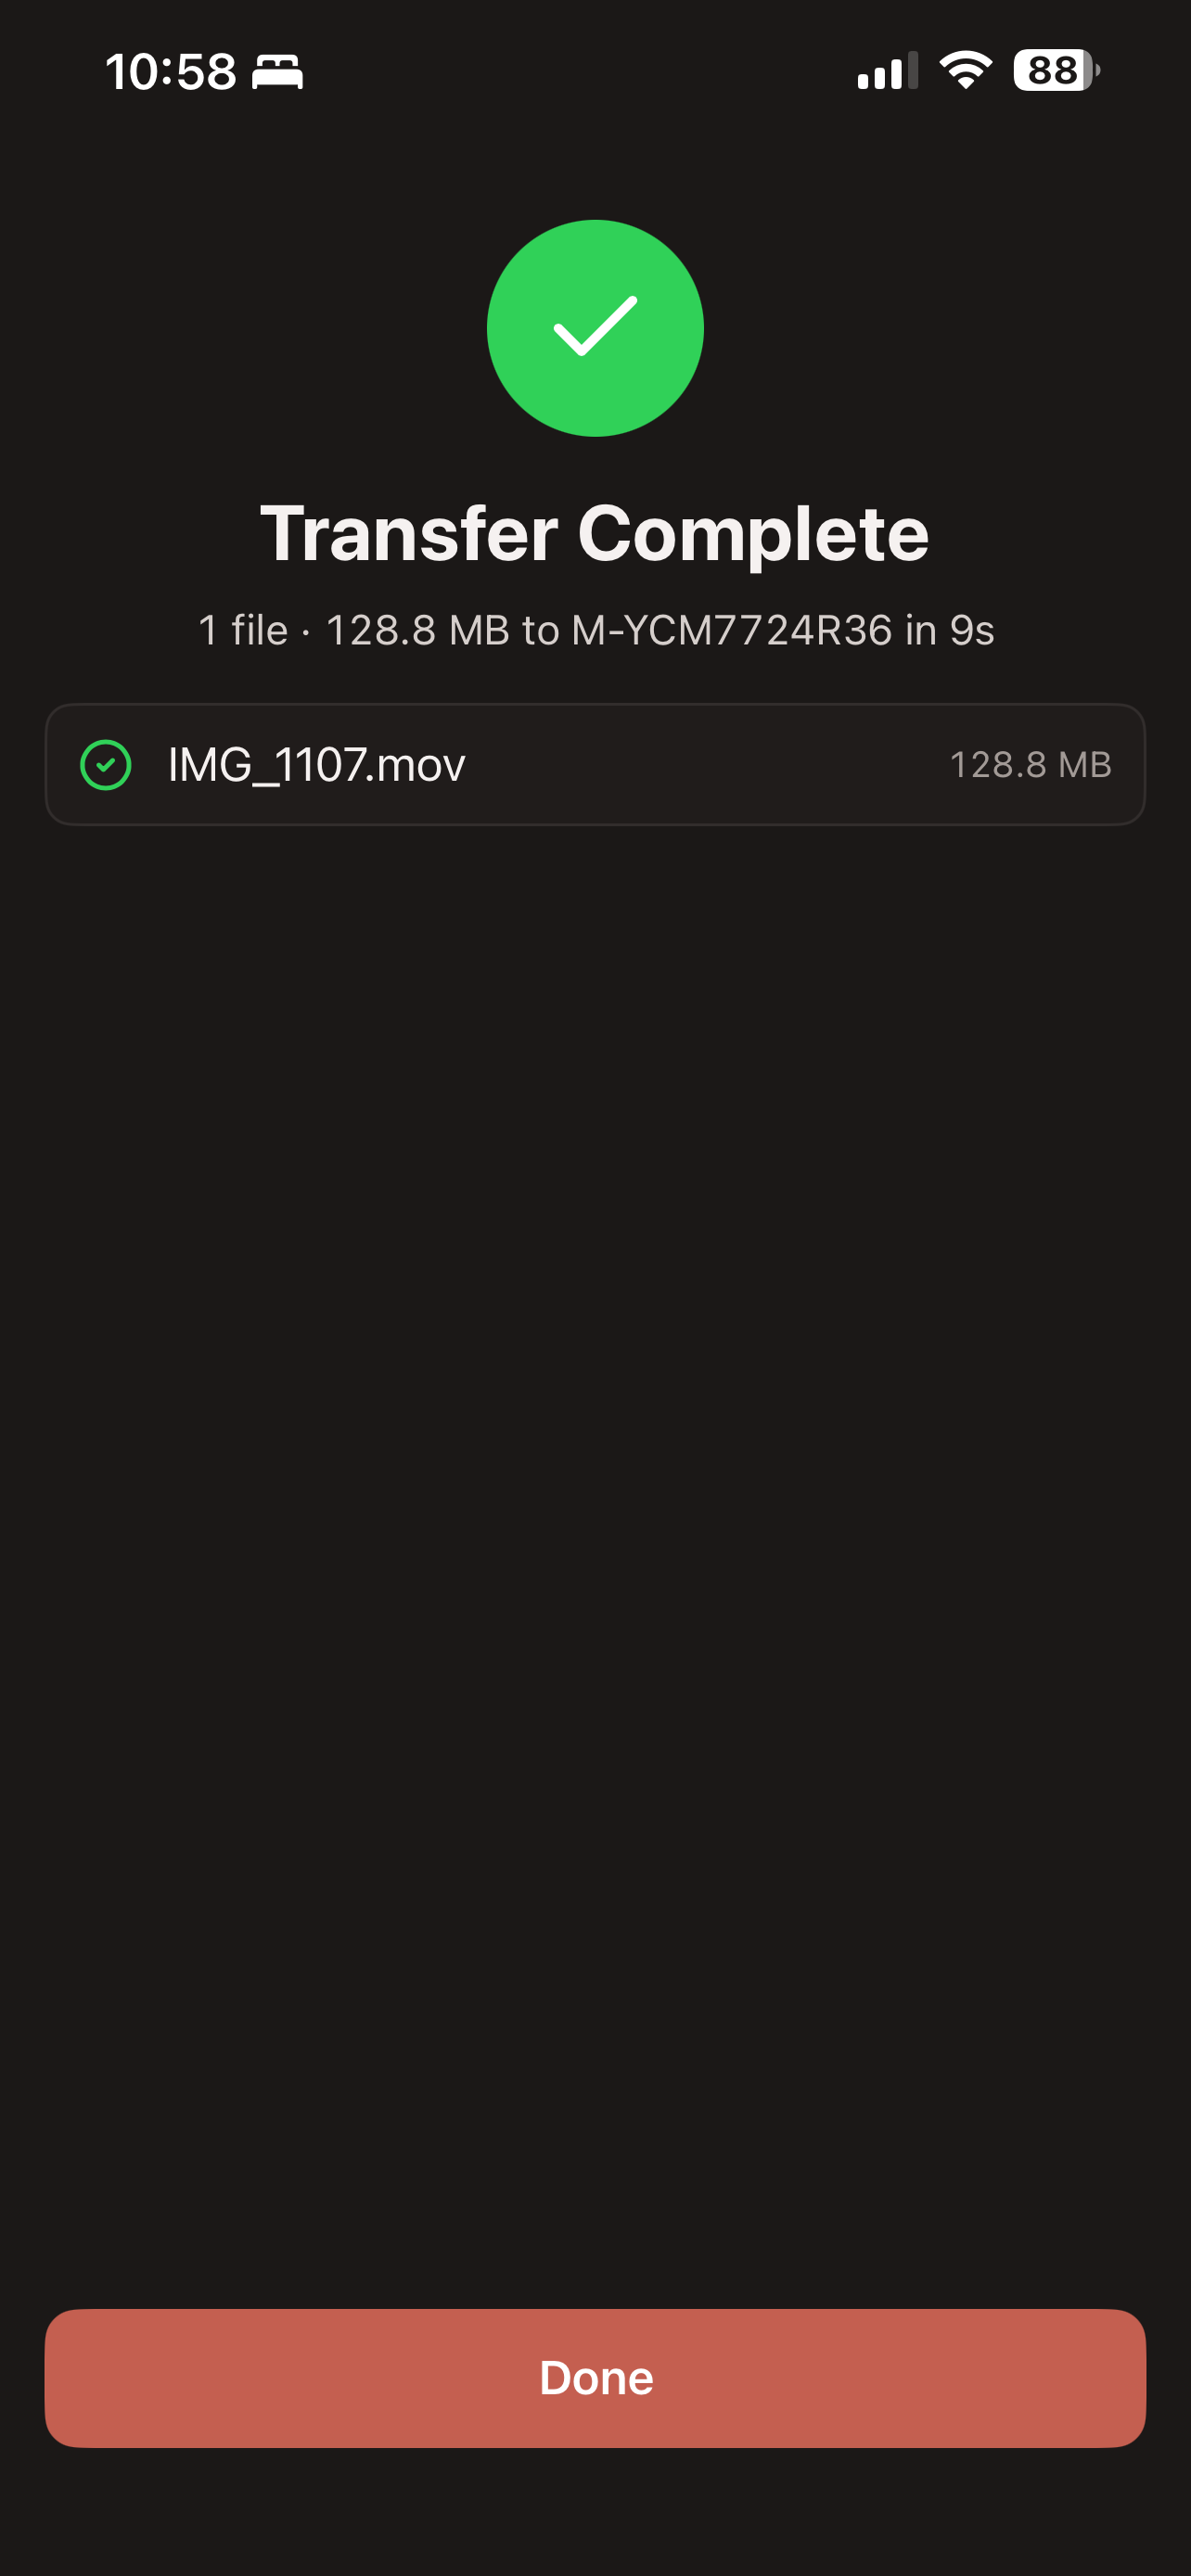
    The green tick means every file arrived. The summary shows how many files moved, their total size, the destination and the time taken. Computer downloads go to the Downloads folder unless that location was changed in FileFly Settings.

2 screensReceiving a fileThe same thing in reverse. Nothing is written to your phone until you say so.
  1. Screen 08

    The request

    An incoming request names the sending computer and lists the files and total size. Nothing is saved until you tap Accept. Tap Decline if you do not recognise the sender or do not want the files.

  2. Screen 09

    Receiving

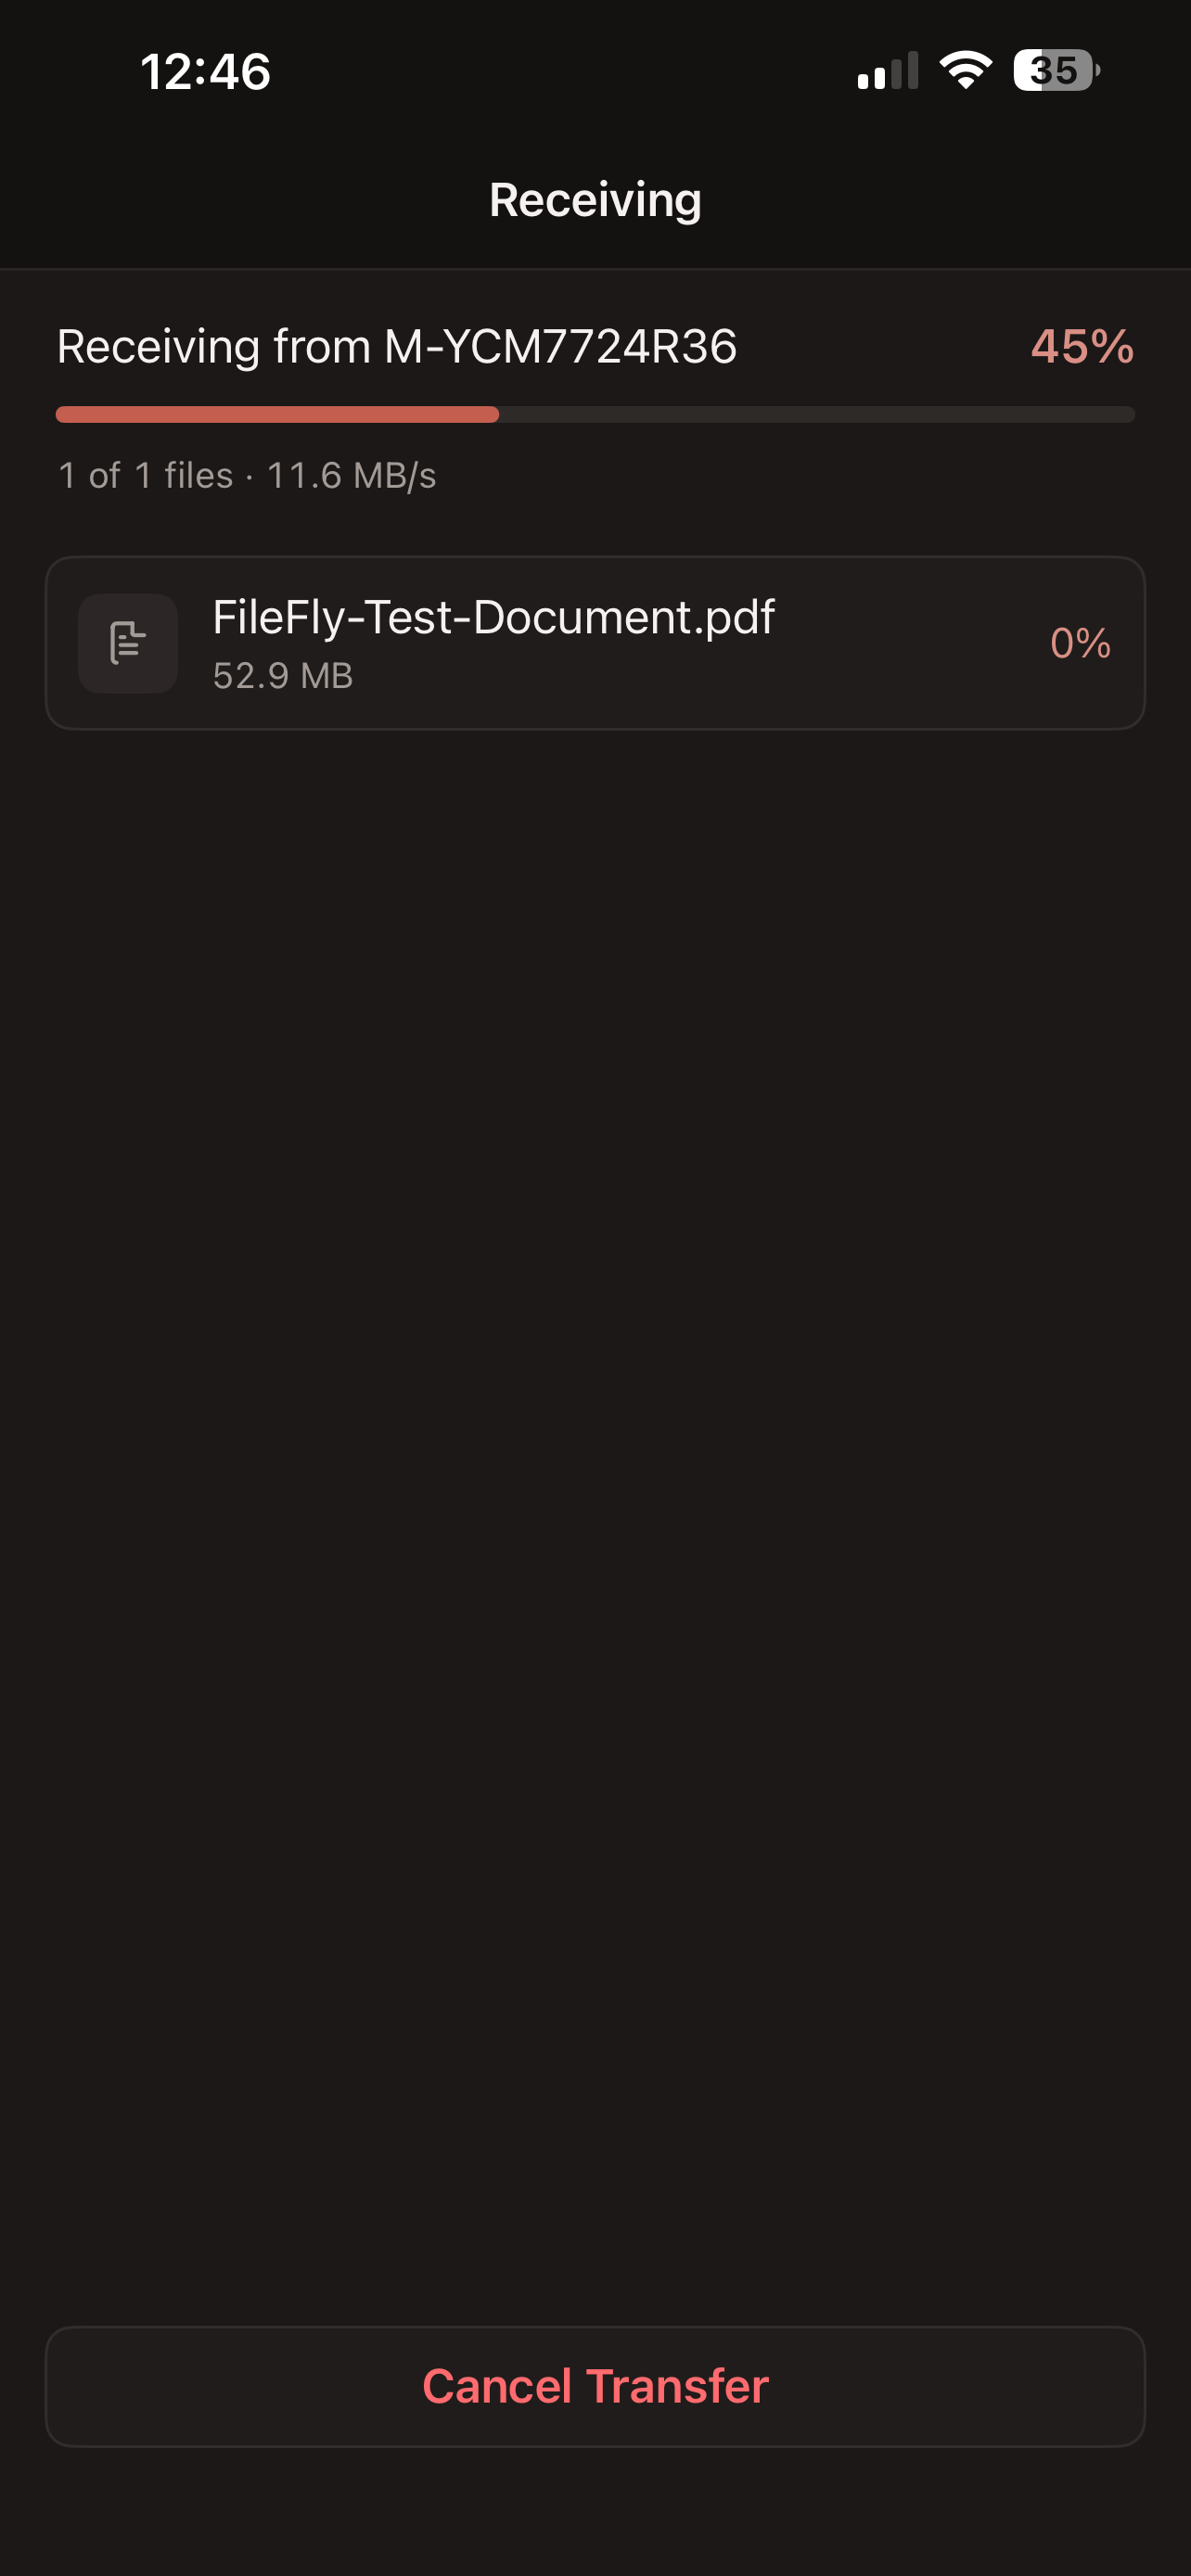
    This screen shows who is sending, the overall percentage, speed and each file's progress. Cancel Transfer stops the remaining transfer and tells the sender.

2 screensAfterwardsWhere everything went, and the handful of settings worth knowing about.
  1. Screen 10

    History

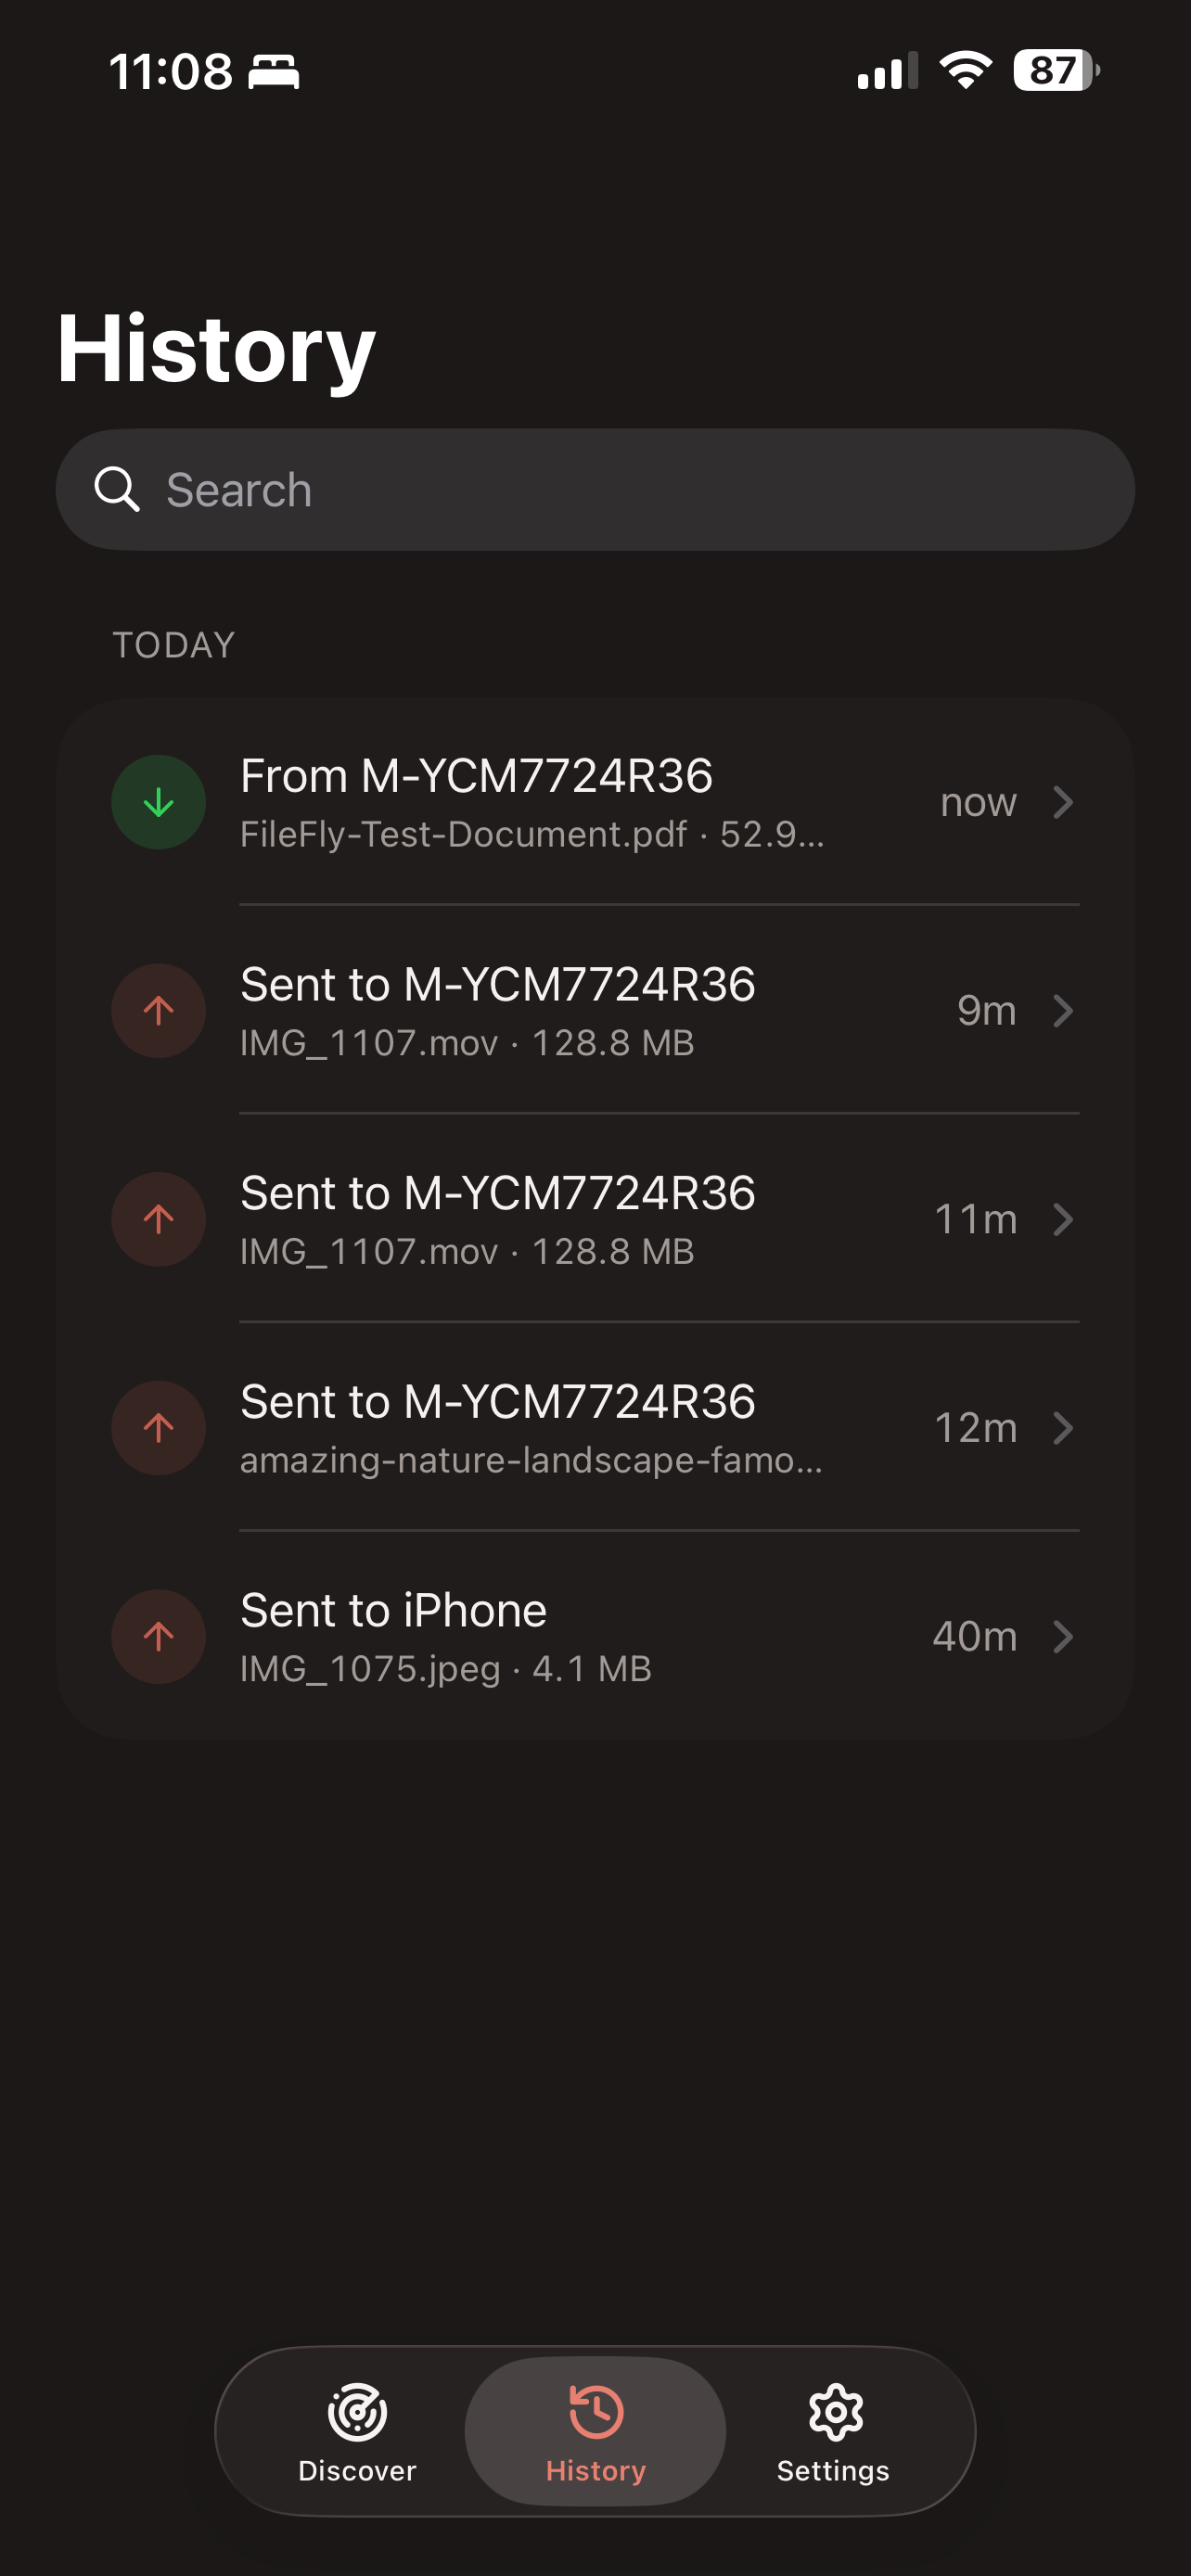
    History lists recent transfers newest first. A green down arrow means received; a red up arrow means sent. Search by file or device name, then tap a transfer to see every file and where it was saved. Received documents can be opened from the detail screen.

  2. Screen 11

    Settings

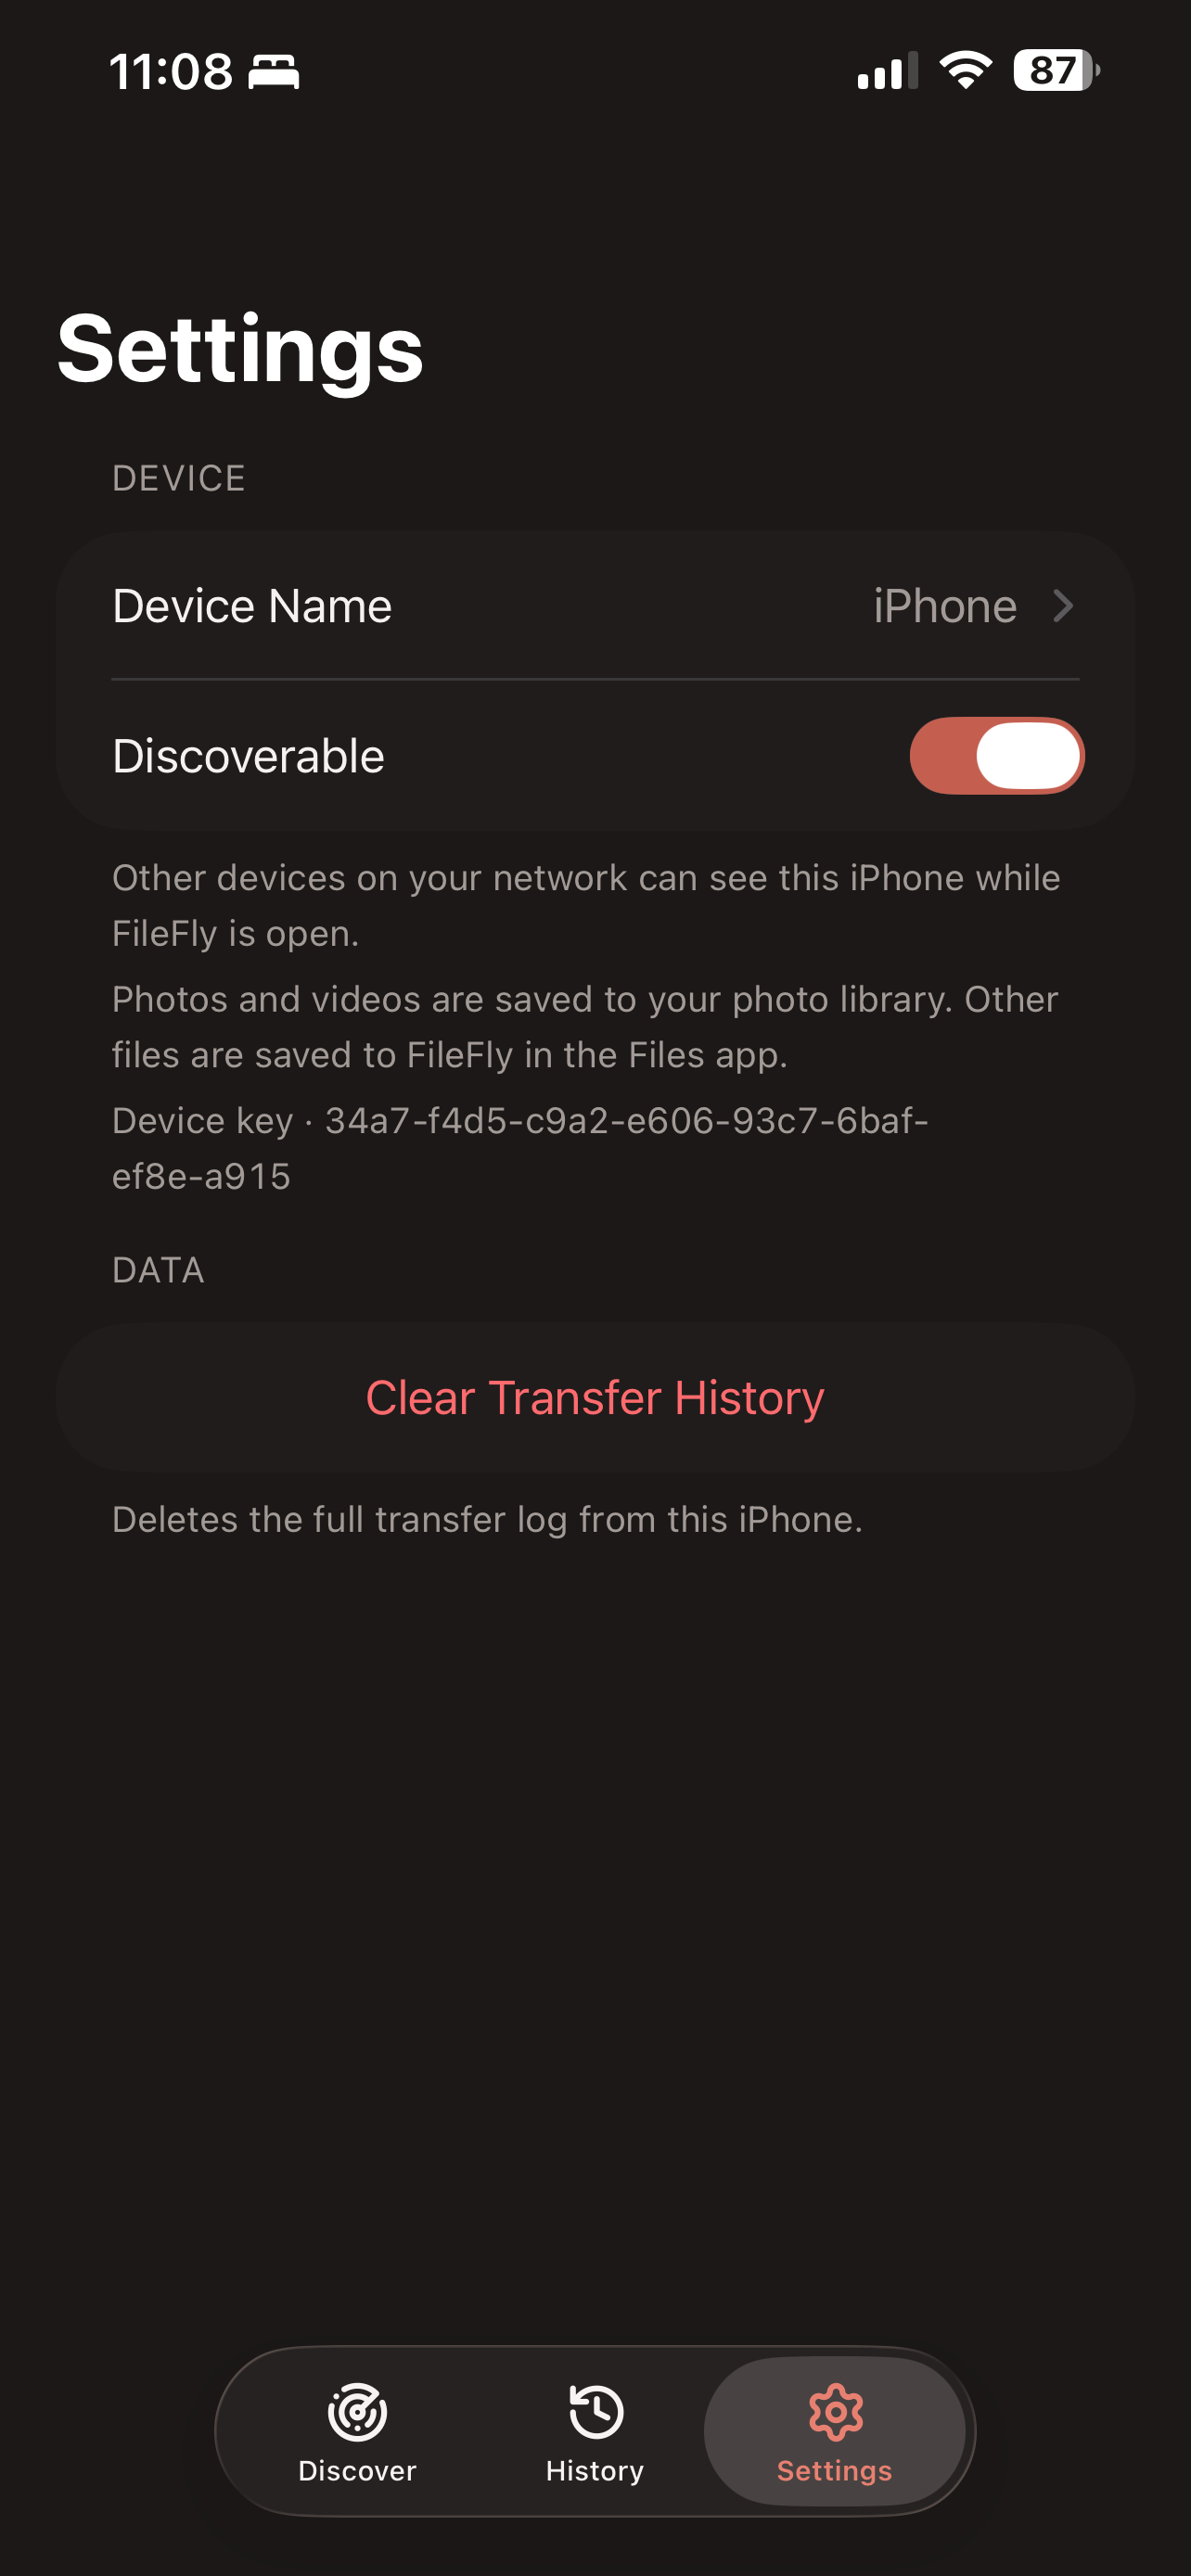
    Change the Device Name that other people see, or turn off Discoverable to hide this iPhone while still being able to send. The Device key helps confirm another device's identity. Clear Transfer History removes the activity list without deleting any received files.

Questions about the iPhone app

Is FileFly for iPhone free?

Yes. It is free, exactly like the Windows, macOS and Linux apps — no subscription, no in-app purchase, and no account to create at either end.

Do I need a cable, iTunes or iCloud to transfer files?

No. FileFly moves files over the Wi-Fi network both devices are already on. There is no cable, no syncing software, no cloud storage account and no sign-in at any point.

Where do the files I receive end up on my iPhone?

Photos and videos are saved to your photo library, alongside your own pictures. Everything else goes into the FileFly folder in the Files app. The detail screen for any transfer in History says exactly where each file went.
Why does the app ask for local network access?

iOS requires an app to ask before it can see other devices on your network, and FileFly needs that permission to find your computers and send files to them. If you decline it the Nearby list stays empty. You can turn it back on later under Settings → FileFly → Local Network.

Can I send something without opening FileFly first?

Yes. In Photos or Files, select what you want, tap Share and choose FileFly from the share sheet. Pick a device and the transfer runs there and then, without leaving the app you were in.

Does it work without an internet connection?

Yes. The transfer happens on your local network. As long as both devices can communicate through the same router, the internet connection itself is not used.

Can I stop other devices from seeing my iPhone?

Turn off Discoverable in Settings and you disappear from everyone else's device list. You can still see other devices and still send to them — it only affects being found.

Does it work on iPad?

Not yet. The first release is an iPhone app, and iPad is not supported in this version.

Is there a limit on file size?

There is no built-in cap. The practical limit is the free space left on the device receiving the file.

Are my files private?

They never leave your local network and are never uploaded anywhere. Every transfer goes directly between the two devices and has to be accepted by the person receiving it. Each device also has its own key, a short fingerprint you can compare across the two machines if you ever want to be certain who you are talking to.

Get it on your computers too

FileFly needs to be running at both ends. The desktop apps for Windows, macOS and Linux are free, and once one is installed your iPhone finds it on its own.

Still stuck? Tell us which devices you are using and what appears on screen, and we will help you find the next step.